Flat Button edges - Third Press Operation - How to flatten button edges. July 21 2011
Flattening Button Edges is only possible with the 1", 2" and 6" sizes only.
Why would you want to flatten the edge of the back of a button. Well for the 6" it makes the clocks look better. For the 2" it is particularly popular with people that make rossettes and also medallions. With the 1" too medallions look better and are easier to stick. You can make a hole using a "Keychain Punch" and put them on a chain or keyring. You can also use a sticky pad, double sided tape or glue.
This is not the same process as flattening the front of a button as is done with 3-1/2" coaster buttons.
When using the Third Press Operation have a rare earth magnet (or strong magnet) to get the button out of the die. It really helps.
Technical details from Tecre - Flat Back Buttons - Third Pressing Operation
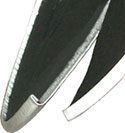
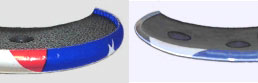
When a button is made with a flat back such as those used for medallions, the rim of the button is crimped at aproximately a 45 degree angle. This leaves a flange extended inward and away from the flat back as shown in the lower left picture.
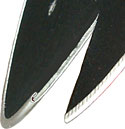
TECRE Co., Inc. has designed and been awarded a patent (# 6,393,686) on its unique Third Press Operation. This process allows the 45 degree flange to be pressed down onto the flat back so a more secure and flat crimp is obtained. This is shown in the lower right picture. The Third Press Operation is currently available for 1", 2", and 6" button sizes.
Flat back buttons can be mounted directly onto plaques, trophies, and other applications with a two-sided peel and stick foam disks. "
 |
|
See the difference?
- Assemble a button without a pin installed in the back. There is no room in the button assembler for pins during the Third Press Operation. Adhesive pins can be attached after the button is complete.
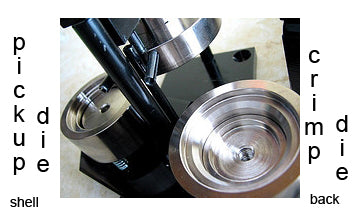
- Return the button face-up into the pick-up die cavity of the button assembly machine (where the shell, graphic and mylar were first placed when the button was made).
- Pull the press handle to the lower limit of its stroke to flatten the edges of your button. If you are using a manual machine the third press will require more force than the previous strokes of the handle.
- Attach an adhesive pin to the button or use a peel & stick foam disk to mount the button on a trophy, plaque or medallion.
 Using the "questions" tab that floats on the right of our pages or call 1866 996 1984.