Tecre button machine tune up. How to fix up & maintain your button maker.
How to "Tune-up" a Tecre, red & black, button maker.
Firstly I personally do not believe in fixing stuff for the sake of it. Fiddling with or dismantling your button maker is a bad idea. These button machines are solid and well made and have a warranty - if it ain't broke, don't try to fix it!
So these button machines have proven to be extremely reliable, doing a little preventive maintenance, from time to time, can help to keep your machine operating smoothly If used with care the following information will show you how to "tune-up" your button maker.
If for any reason you are uncomfortable following these instructions, give us a call or swing by and we will make arrangements for you to return your machine and have us do the tune-up your machine for you.
Don't simply try to pry apart the dies, if you have it jammed, as you will likely damage the dies.
Also, DO NOT attempt to dis-assemble your machine, as you most likely will be unable to re-assemble it and have it work properly and may well damage it in the process.
Doing maintenance on your button making machine.
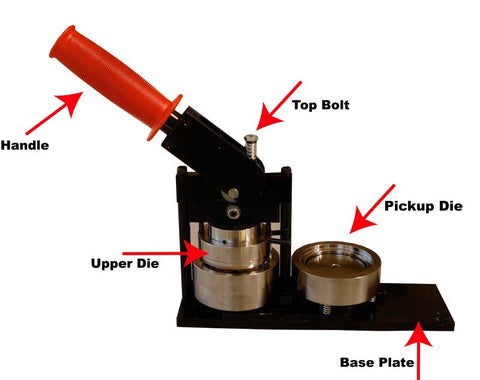
To do a tune-up, you will first need to gather a few items. You will need:
a 7/16" wrench, a can of silicone spray lubricant, a 3/16" allen wrench, and paper towels.
Step 1: Spray a small amount of silicone spray at each location marked by the arrow, in the photo below. (If you use too much silicone spray, it will end up on your button designs, which won't be good).

Step 2: Now take the handle and work it up and down 5 or 6 times. You want to work the silicone spray down into the upper crossbar that the two bolts go through (shown in the photo below) Also spray a little silicone where the handle attaches to your button machine. Do so on the other side of the handle, as well (not shown).
Step 3: Rotate the pick up die and crimp die so they are positioned as shown in the photo below. Take the paper towel you sprayed with a small amount of silicone spray and rub it around the beveled edge of the Crimp Die. Doing so will help prevent an issue where the mylar disc doesn't crimp tightly and has a bit of a "bubbled" look at the edge of your button. The silicone spray allows the mylar to slide smoothly.
You may repeat this last step anytime your mylars don't seem to be as tight as they should be..
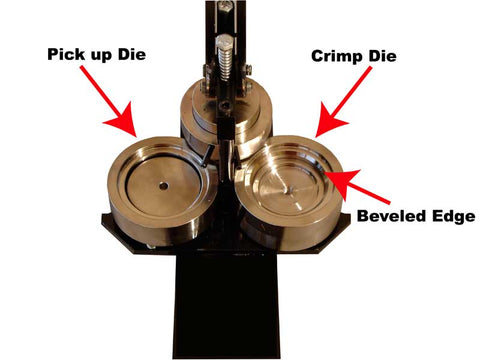
Stick lubricant works very well if you are having issues with the mylar not crimping properly.
Stick lubricant available in your local hardware store or also online: here.
Step 4: Now rotate the pick up die so that the upper die is located directly above it. Then push the handle down all the way so the upper die slides into the center of the pick up die (not shown).
Step 5: Next, take the 7/16" wrench and tighten the two top bolts (shown below) until they are both snug. DO NOT overtighten these bolts, as doing so will damage your machine.

Step 6: Now spray a small amount of silicone spray onto a paper towel and spread it around the outside of the inner plug on the upper die (shown below). Doing so will make it easier for the outer ring to slide up and down during the button-making process.
And spray a little silicone spray on the base plate on which the dies rotate (shown below). Doing so will make it easier for you to rotate the dies as you are making buttons. Again, not too much or you will get it on your hands and on your buttons.

Step 7: Now turn your machine over and use the 7/16" wrench to tighten both brass colored bolts (in the photo below). Make them tight, but DO NOT overtighten them, as doing so will damage your machine.

Step 8: And finally, find an allen wrench that fits inside the "Flat Head Bolts". First slightly loosen the Flat Head Bolts (see image above) and then snug them down. DO NOT overtighten them, as doing so will damage your machine.
That's all there is to it. Your button machine should now work as good as new!
If it doesn't, or if you are uncomfortable following these instructions, give us a call and we will make arrangements to have you return your machine to us and we can do the tune-up for you.
Under no circumstances should you attempt to dis-assemble your machine.