How to “Un-Jam” your Tecre button making machineBefore we get started with the... April 03 2012
How to “Un-Jam” your Tecre button making machine
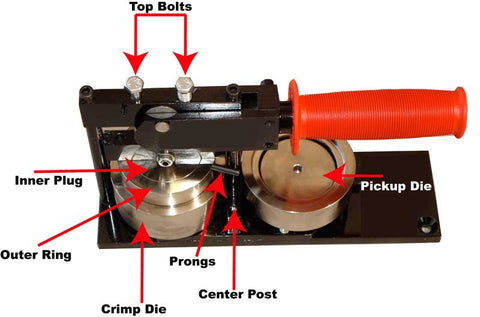
Before we get started with the instructions on how to un-jam your machine, take a look at the photos below and familiarize yourself with the names of the various parts of your button machine. Doing so will make it easier to follow the step by step instructions.
Jamming a button maker is very easy to do. You can get a jam if you don’t notice that two shells (fronts) or two mylar are stuck together. Another thing that happens is that after you have put a shell image and mylar into the top die using the first press you get distracted….. the phone rings and then you go back and load the first die again, you press and kathump! You’ve got a jam.
So as I say, it’s easy to jam a button maker and it’s not too difficult to unjam it. Read on……


Unjam your button machine
If your button machine has jammed, the information below will show you how to free it up.
In attempting to unjam your machine, DO NOT use a hammer or screw driver to pound or pry the metal parts of your machine. Doing so WILL damage your your dies!!
If you are unable to unjam your machine, or are uncomfortable following the steps listed below, you can swing by or return your machine to our office and have us un-jam it for you.
The three most common reasons that can cause a machine to jam are:
A. Placing more than one shell (the button front) into your machine.
B. Placing more than one mylar disc (the plastic) into your machine.
C. Going back to your button maker and forgetting that you already have a shell in the upper die.
You can sometimes “un-jam” a machine simply by moving the handle up and down several times in rapid succession.
If you are able to do so, try rotating the dies (without using force) so the upper die is above the crimp die (the die that holds the button back). Then move the handle up and down 5 or 6 times. If that action is going to free up your machine, 5 or 6 times should do the trick.
If it doesn’t, or if you are unable to rotate the dies without using force, proceed to the next step.
If the previous step didn’t work, the upper die is unable to return to it’s normal position because a button is stuck in the upper die. And because the upper die is “stuck in the up position” you are unable to rotate the dies.
So what we need to do is to free the upper die assembly.
I recommend using the following strategy to accomplish this.
Take a piece of wood, such as a 1” x 2”, 2” x 2”, or a thick wooden dowel) and with your button machine sitting on a table or counter, position the piece of wood so it sits on top of the “Outer Ring” but doesn’t cross over to the “Inner Plug”. Hold the piece of wood length-wise and use a hammer to tap the edge of the wood (NOT the machine itself). What we are attempting to do is separate the outer ring from the inner plug. Doing this should loosen the stuck button part from the upper die.
It is recommended NOT TO FORCE OR PRY the dies apart, as this will damage them. Ease them apart without damaging your die.
Hopefully, this will have freed the jam and the dies can now swivel but you may still have button parts jammed up inside the upper die. These need to be removed. If you put your finger up inside the upper die you should be able to feel the screw hole. If it’s smooth you still have a button inside.
An awl is useful for removing jammed buttons also try this article.
