Buttons, Badges & Pins - People Power Blog
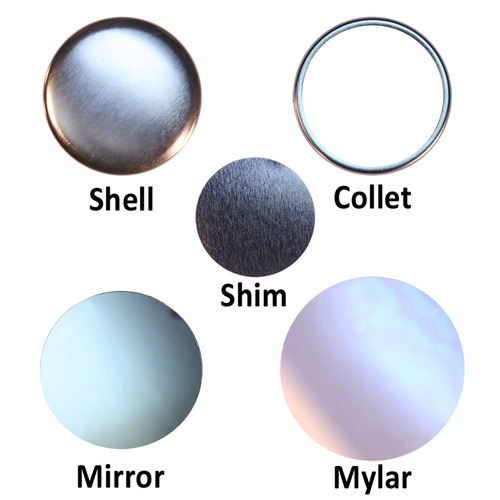
Mylar - The stuff that makes your buttons shiny! February 22 2013
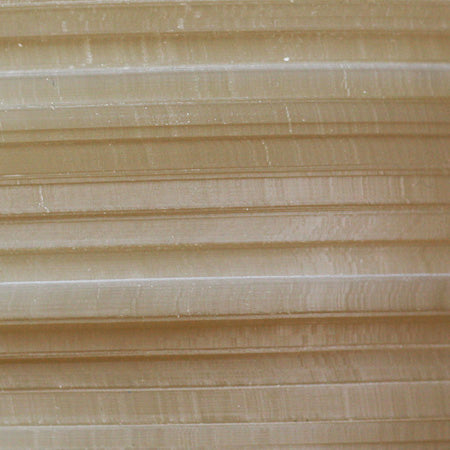
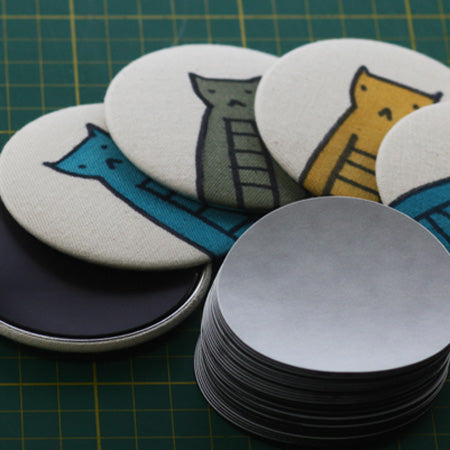
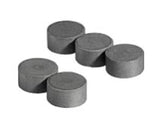
Side view of a stack of Mylar for button making. That stack will make about 1000 pin-back buttons. Mylar is available in 2ml & 3ml
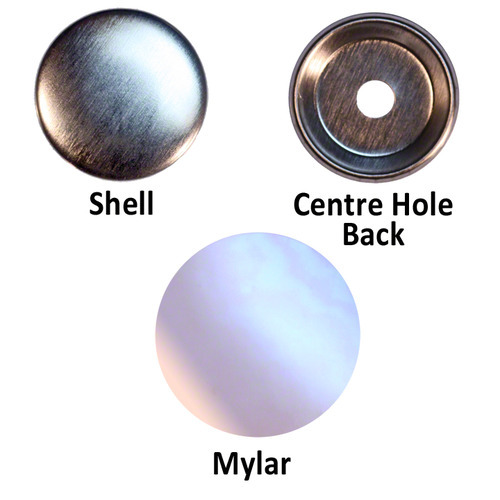
The plastic glossy cover on a button is actually made from mylar. Mylar is quite durable, strong, has a high tensile strength so it is ideal for holding buttons together. The mylar goes over the image to seal the button.
Read more »
Non-Profits, Not-for-Profits, Charities, Organizations – Why you need a button maker! February 15 2013
Non-Profits, Not-for-Profits, Charities, Organizations all need to raise funds for their causes. There are many ways to do this. Many of them get into the junkmail business, many canvas door to door or on street corners. Many of the canvassers do not even care for the cause and are paid quite well for bugging people. The large charities employ sub-contractors to knock on doors and if they make a sale of, say, a $10 monthly subscription the first 2 years or as much as $240 will go to the sub-contracting company and only the subscriptions in the third year and beyond benefit the charity. I know I’m going to get angry emails from the large charities telling me “It’s only the first years subscription that goes to the sub-contractor” but whatever the deal is and I know they vary, I don’t think the generous subscriber new they were filling the coffers of the for-profit canvassing company. Full disclosure and real volunteers would be a better way to go, but I actually believe these charities harm their image when they call people on the phone during dinner or knock on doors when people are relaxing (or sleeping). As for the junk mail? That’s just got to stop. Our household has given annualy to possibly 10 charities for years. We probably get more than 1000 letters a year. Yes averaging more than 3 unnecessary letters a day. You could argue that’s a lot of trees but it’s also a lot of cash that should be going to saving whales, fighting climate change, or building women’s shelters. It should be used for whatever the money was actually intended for.
 |
 |
 |
|
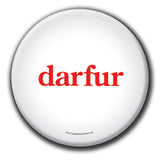
| Darfur, Sudan relief |
Anti-poverty | Haiti relief | |
| campaign button | fundraising button | fundraiser |
Fundraising with buttons is extremely low cost, fun, attracts new subscribers and interested parties and does not bug anybody because people come to you
There are many ideas for using buttons to fundraise and I will layout a few ideas to show that instead of sending junk mail getting a button maker is a better investment.
1) Buttons are a low cost way to promote your organization. Get your name logo out there. It’s obvious but simple.
2) But what about a “Make your own buttons table” in front of your office, at street festivals, yard sales, schools, universities or any public events. As well as your button maker you need blank circles, crayons, pens and markers. Get people to draw their designs and put it in a button for them right there and then. People will flock to your table and as they come they will bring more people (naturally, you don’t have to set up a robocall) Make it for a donation for your cause and you will get $5, $10 for a button that costs 8 cents. I once even got $50 for a single button because the donor believed in the cause. You should also have your own designs available at the table for people who don’t want to draw. Not just a button with your logo but a load of buttons that are relevant for your cause. Make them funny, make them pertinent, make them serious. Make some radical and some gentle. Have buttons that describe the full array of your cause with humour and with passion. All the time people stand at your table, reading your button designs, more people will come. ( You won’t have to bludgeon anyone with your clipboard anymore, they will come to you.)
Do get a graphic designer to design your buttons! Good design is the key!!!
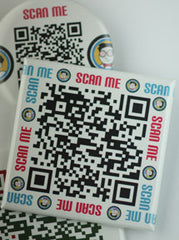
3) Got something interesting on your website? Draw traffic to the page with a QR code. What’s a QR code?
Pin-back buttons, pins, badges or whatever you call them are an ideal vehicle for promoting websites but what about a button that can be scanned on a cellphone and the image takes the cellphone user straight to your website.
QR codes don’t just need to go to a homepage, you can generate a QR code to lead a browser to any web address, to a special offer page, to a secret page or a surprise page. Follow a QR code button on your smart phone and see where you end up!
4) Use your button maker as a tool to leverage volunteers. If you have a large number of volunteers coming in to help then that’s great but you need a way to utilise that people power. You also need a way to give those that do volunteer a sense of satisfaction, the sense that there voluntary labour was put to good use. I used to be involved in an organization that had lots of walk-in volunteers. I found that if I invested time in explaing tasks to them I would sometimes be dissapointed as they could loose interest and drift away. On asking I found they often thought the volunteer jobs pointless. But explaining to a new volunteer how to make buttons takes literally a minute or two. They work away at making buttons and as the finished buttons pile up they get a sense of achievement. You can use the button maker to judge staying power in your new volunteer. Once they have proved themselves making buttons for your next event, you can invest some time and take them to the next level, they have earnt it.
5) A printing press in your office. Once you get good at making buttons you can publish a new button even daily, it takes minutes. As and when a new campaign slogan comes up, a reaction to a press release or a new idea formulates; put it on a button. Have new designs on the website with a pile of freebies at the front desk for drop ins, for a donation or otherwise. Those buttons will go forward and spread the word. Let your supporters spread the word for you.
- Buttons are inexpensive
- Buttons are excellent low cost fundaisers (Do the math!)
- Buttons draw people to your organisation
- Buttons draw traffic to your website
- Buttons can be used to leverage volunteer power
- A button maker is like your own printing press in the office
 Syndicated blog from TheButtonGuy.net
This article is reprinted with permission.
http://TheButtonGuy.net/
Read more »
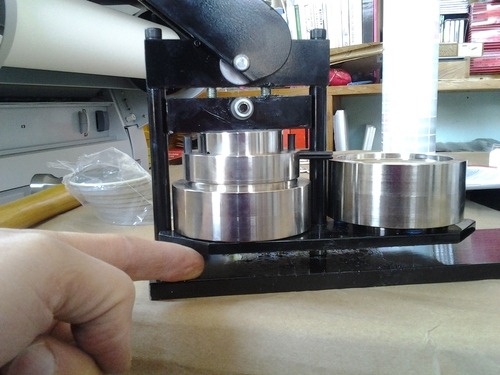
Question: Are the tecre machine molds interchangable or are the units fixed? February 15 2013
Hi Yes Tecre or all good button makers are fixed. There are 2 problems with interchangeable die button makers.
- Interchangeable die button makers use a plastic base for the die carrier. After a short time this wears and the button maker no longer lines up properly. All good button makers are single die non-interchangeable and they last 25 years.
- The 2 common manufacturers of multi die machines are BadgeAminit or of Chinese origin. Made in China button makers are not North American standard but European standard with sizes in millimetres. (a) They are very expensive (b) They are not well made, often using glued pins or white plastic backs. Badge-A-Minit button parts are equivalent to standard North American Button Parts but they are up to 3 x the price.
I would always recommend a solid metal button maker, no plastic parts (on the button maker or the button parts) and the button maker should be of a standard North American size so that you can use cheap, good quality button parts. At the end of the day your customers, clients or purchases of your buttons don’t care how you made your buttons. But they do want an excellent quality all metal button and you want to produce that at the best price – so get a Tecre Button Maker.

Looks all very well but the white plastic base will wear out pretty quickly and the button maker will not align any more

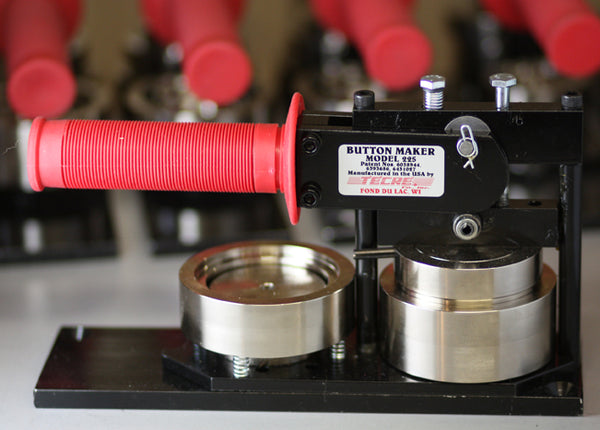
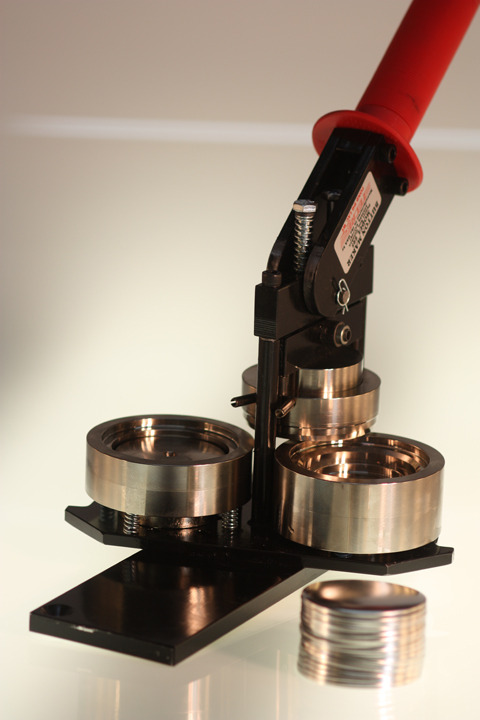
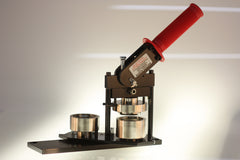
All metal, solid steel, no plastic – How a button maker should be!

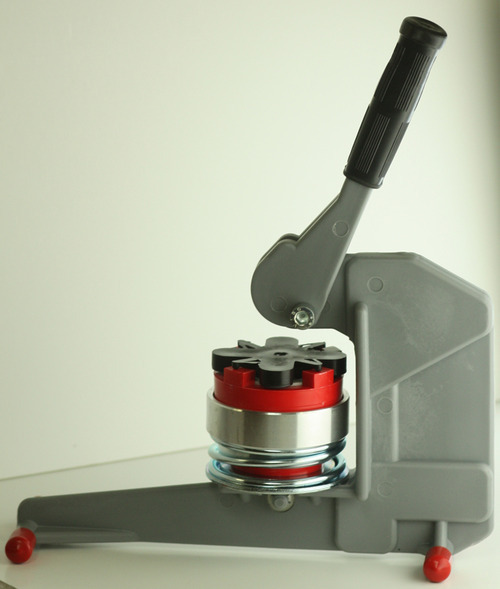
Tecre button maker with the distinctive black with red handle.
Syndicated blog from TheButtonGuy.net
This article is reprinted with permission.
http://TheButtonGuy.net/
Read more »
Stronger Ceramic Magnets now available from various sources February 13 2013
I am pleased to see that stronger magnets are now available so that there’s a bit of a snap to the magnet button when it goes on the fridge. Of course you can use rare earth magnets but ouch! They are expensive. But ceramic magnets seem to be available at about the same price as the peel n’ stick magnets. Ceramic just looks way better as well as being stronger!

Ceramic magnets are stronger and can also improve the look of the back of the button.
I see the new ceramic magnets available for 1″, 1-1/4″, 1-1/2″ and 1-3/4″ are now available from some distributors.
Checkout your favourite distributor and make your magnet buttons even better!
The Button Guy
 Syndicated blog from TheButtonGuy.net
The following article is reprinted with
permission.
http://TheButtonGuy.net/
Read more »
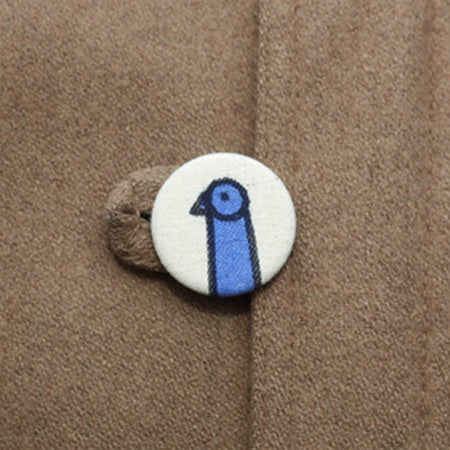
Bring Pin-back Buttons to Clothing February 06 2013
Making your own Custom Buttons for Jackets, Accessories and Furniture
It is certainly confusing when writing about buttons. At People Power Press we call pin-back buttons "buttons" and we think of them as buttons but more commonly the word "buttons" refer to what do up your shirt. This is the kind of button that I am about to write about (and yes, you can make them using pin-back button supplies and a button maker).
Using pin-back button supplies and a button maker you can make your own buttons for clothing, accessories and furniture.


Once pressed sew thread through the metal loop of the welded up eye onto your desired surface. This is a great way to customize your jacket, pillows or couch, and other accessories.
Read more »
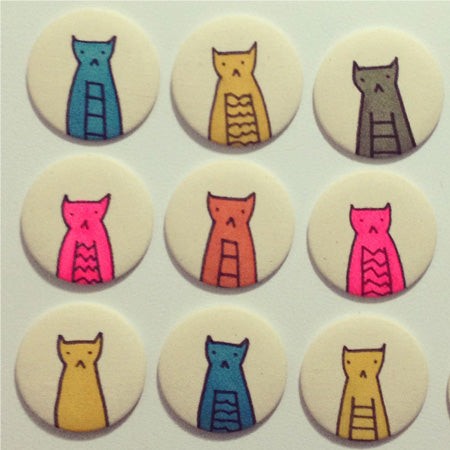
Are you an artist? Button painting is the new thing! February 02 2013
Making Canvas Buttons - Button painting
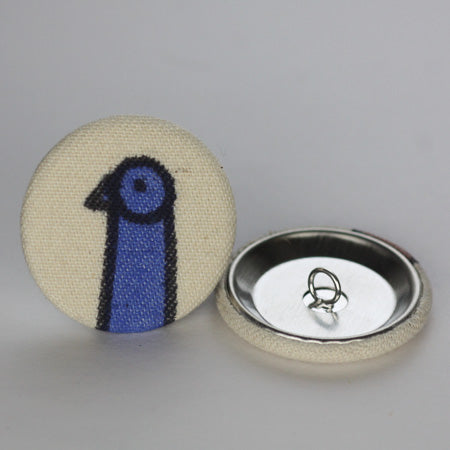
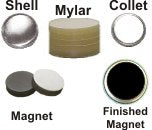
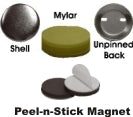
Making canvas buttons is a great way to put your art on a button - and a refreshing artist material to work with. Making a canvas button is very similar to regular pin-back button making except that you use canvas instead of paper and mylar. You will also require a shell and preferred back. In the following example, I chose to make magnets and therefore used a flat back. In terms of fabric, I found that a light-weight, tight weave 100% cotton unbleached canvas works best for button making. You can experiment with different thicknesses of canvas but I found that heavier canvases did not press properly. Also pay attention to the weave - look for tightly woven canvas as it will produce less fraying when cutting and pressing, and helps to add to the opacity of the finished, pressed button.
Put your art on buttons
Cut out Canvas Circles
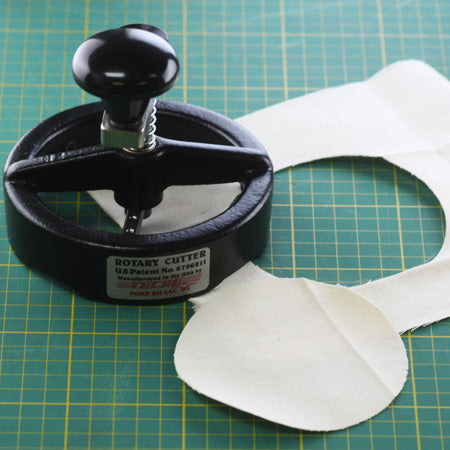
To begin with you need to decide what size of button you wish to make and then cut out appropriate sized circles. I prefer to use an adjustable rotary circle cutter which is great for cutting fabric and is more accurate and faster than using scissors but of course using scissors will work too. The adjustable rotary circle cutter cuts in pre-set stops for five popular button sizes: 1", 1-1/2", 2-1/4", 3", 3-1/2" with easy and fast adjustment between sizes. If you use this cutter there is no need to trace a circle on your fabric beforehand. Just place the cutter on your blank sheet of canvas and cut away. If you are using another cutting method, like scissors you will need to trace the appropriate diameter cut line onto your canvas. For a list of diameter cut lines for popular button sizes you can view them on our website or you can simply trace a piece of mylar appropriate to the size of the button you wish to make.
Paint your own buttons.
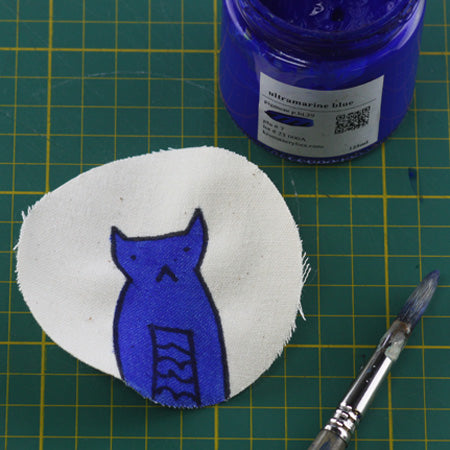
I thought it would be cute to paint cats on my buttons so I drew the black lines with a permanent marker (Staedtler or Sharpies work well) and then painted them with artist's grade acrylic paint. Artist's acrylic paint isn't the same as fabric paint but I find it works just as well, is flexible when dry and the colours will be more vibrant and will not fade. I chose to create my artwork on the canvas prior to pressing the button as it becomes more difficult to draw on the convex shape once in pressed state. But that is up to you! Also, I intentionally drew my art work right to the edge of the canvas surface, so that the image will wrap around the edge of the button and tuck in when finished.
Ironing your canvas
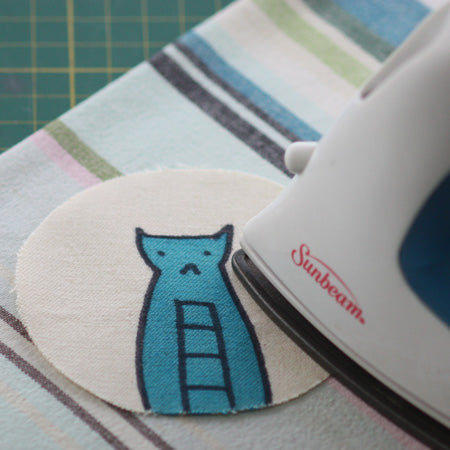
Once dry, the application of paint will have warped your fabric which makes it harder to seat in the crimp die of the button maker. To combat this iron flat before pressing.
Pressing a Canvas Button
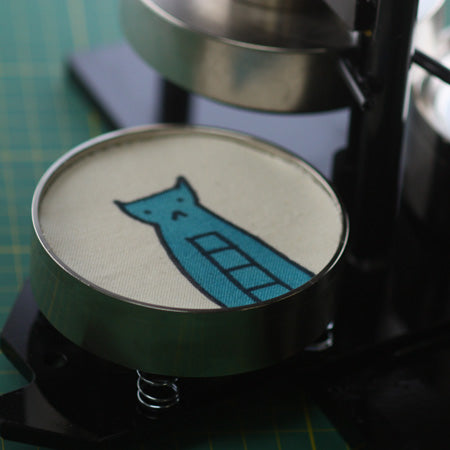
Place your artwork on top of a shell in the pickup die of the button maker and proceed as though you were making a button. Make sure to wipe the upper die of your button maker with a cloth before pressing with canvas as grease/dirt may have collected from previous use. If making a button, make sure that your artwork is seated in the right direction in relation to the pinback, but in the case of magnet backs/flat backs, it doesn't matter.
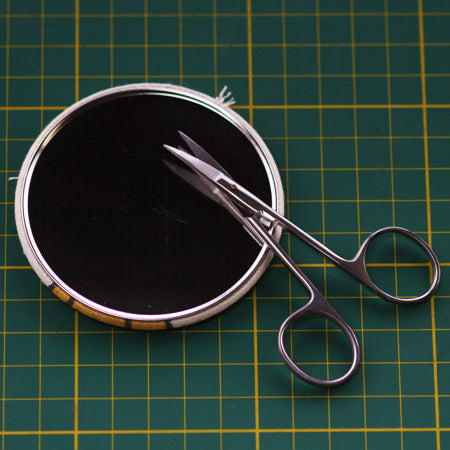
Cut off or use tweezers to hide any stray threads that may have resulted during the button-making process.
Make a magnet
I chose to make magnets out of my canvas button fronts. With this type of magnet, peel and stick the magnet onto the centre of the flat back of the button. You could choose to make other items such as key-chains, mirrors, bottle openers or pin-back buttons. To view our selection of button parts please visit our website.
Make your buttons unique and original!
Happy button painting!
For ideas and useful information on making buttons checkout The Button Guy Blog or take a look at the Video Page.
Read more »
Renting a button maker in Toronto January 19 2013
Renting a button maker in Toronto couldn't be easier. We all possible sizes of button maker in our rental program from less than an inch to 6 inches. We have round, square, rectangle, oblong and oval button, badge and pin making machines.
Button Maker Rental Program from $58.04 / day.
People Power Press
3095 Dundas St West
Toronto, ON M6P1Z9
Tel: 416 204 1984 Open Monday-Friday from 11am to 5pm and Saturdays 11-4
We are open weekdays for button making machine rentals in Toronto. Closed Weekends. You can pickup a machine and the necessary parts from our store in the Junction from 11am to 5pm. To rent a button maker you need a credit card and we take a security for the value of the machine on your card. It is better to call in advance and book your rental so we can also prepare the machines as well as the button parts you will need. On pick up we will show you how to use the machine if you need it. BUTTON MAKING TRAINING INCLUDEDWith our rental service you can rent a wide range of button makers from less than 1” to 6” round as well as oval, square, oblong and rectangular shapes in varying sizes.
Below is a link to our online Toronto Button Maker Rental product. Rentals include the button maker as well as the corresponding Graphic Punch for circle cutting. You can place your order online.
This is the perfect Toronto button making rental opportunity! If you need to rent a button maker in Toronto we have everything you need!
If you have questions please feel free to call us on 416 204 1984 with any questions. Checkout the online order form.
Read more »
What printer and what ink would you use for business level quality graphics? January 14 2013
Syndicated blog from TheButtonGuy.net
The following article is reprinted with
permission.
http://TheButtonGuy.net/
Original question: In your experience with button making what type of printer and ink would you use for a business level quality graphics? I know that over time ink can sun bleach and paper can break down, so for a good quality product for my customers any ideas? I have not started my button side of my business yet but looking to soon. Love your site btw and thank you for your time. Have a great day.
Paper choices for Button Makers and Button Making.
Button makers are mostly designed for standard 20lb (75gsm) to 32 lb (120 gsm)paper. There are some special photo button machines designed for thicker photo paper but in the digital age photo paper is a bit obsolete so the special machines are quite rare and not really necessary. I think the key to good buttons is that you choose a super white paper, the look and the way it prints being more important than the weight. That way when you print black (or any other color) on white you have the maximum contrast. I have also found that papers with a gloss finish print well.
When purchasing paper I have always found better prices and quality from commercial print shop suppliers rather than retailers like Staples. A standard pure white glossy commercial printer paper will do it. No problem.
Printer choices for Button Makers and Button Making.
Your choice is basically Ink Jet or Laser. Inkjet will give you better quality for photos and artwork especially if you get a high end Epson but you will pay dearly for the ink. Inkjet or bubble jet have higher resolution than laser. Laser printers are not as good quality but are generally reasonable quality and are much cheaper per page. I have tried many but I have not found a good quality entry level laser printer (Up to $800) that can compete with the big machines installed in copy shops. A good copy shop can give you really high quality results but don’t just go in and accept what you’re given. All print jobs need a little tweaking. Colours can be enhanced, saturation improved. Find a printer that cares and then give them lots of business. Remember the quality of the printing can make or break your custom button business. Once you’ve established your business it becomes time to consider the big expensive photocopier on a 5 year lease with a click charge per 18″ x 12″ print.
If you decide to print from your home or office with a $300 printer that can work too. Make sure you’re maximizing the page and remember you do not have to print right up to the cut-line. Save ink and take out any unnecessary color on your artwork that does not show – the buttons are not affected. See the example below. These are 1” buttons and 42 buttons fit on each letter size page. The cut size for 1” buttons is 1.313” but we cut the color short – the white does not show on the button.

Also speaking of saving ink, I personally have had no luck with refilling my ink cartridges. The colors coming out of my printers have always suffered. I am not supporting Canon, Xerox and the rest for overcharging for their cartridges and I have saved money by refilling cartridges locally but quality always declined. If color is not crucial it’s a good way to go.
Some companies, like Xerox have solid ink printers. These printers are not ideal for button making if you are making custom buttons for clients because the colors are way off and that can be a problem. Solid ink printers may be good (or not so bad) for the environment but people are often fussy about their corporate logos and business colors and that can lead to problems if your printer cannot match colors on the monitor.
Issues with bleaching and paper deterioration.
I have never found bleaching or paper deterioration to be a problem. I have a few buttons that are maybe 20 years old. Yes the paper changes color but that even adds to the effect for an old button. You could try using acid free paper but I don’t think it’s necessary, buttons are pretty durable. I had a store with a south facing window that got direct sunlight all day. I filled the window with a mosaic of buttons and yes after a year buttons began to fade and after 18 months it was necessary to change them, but that is exceptional exposure for a simple button.
Cost of button printing.
The cost of printing buttons varies tremendously. I calculated that some photo buttons using a cheap Canon printer ($400) with a 4 colour cartridge system ($440 for 4) were costing $1.30 for a full sheet. Ouch! But that was the luxury of doing it at home and not going to a printer and that meant printing costs of 3 cents for a 1” button (42 up) and 8 cents for a 2-1/4” button (9 up). These days I have an 18” x 12” Xerox @ 8 cents a sheet. That means the 2-1/4” button print costs 8 cents per 18 buttons as opposed to 8 cents each. The difference in the cost of printing buttons can be huge! But if you’re selling a custom button service print quality is key.
Read more »
Which button maker, badge machine or pin maker would you recommend for a young artist. January 12 2013
Hi Button Guy, I’m a young artist and lately I have had customers asking for customized buttons. I really like the idea but I’m not totally sure on where to begin, I don’t have that much money to spend on a machine and supplies at the moment. Out of the machines you have tried, which would recommend for a first timer on a budget? Also, what companies do you recommend getting the supplies from? Julieann – Indiana
Hi Julieann
I work closely with Button Giant: http://ButtonGiant.com
They do have a good starter machine. http://buttongiant.com/collections/frontpage/products/2-1-4-t15o-button-maker-hobby-kit-circle-cutter-250-button-parts-and-free-sample-pack I have tested this kit. It’s cheap, works well, But read on!!
As a designer or as an artist, buttons are a great way for getting income, promoting your projects and creating a following. Whilst your designs and style will change and develop over the years, you will be able to use buttons at gallery openings, for website promotion, even as a calling cards or business cards. The low cost of buttons means if somebody picks up one of your creations and pays $2, $1.90 is your cost excluding labor. Sometimes it’s better to ask for a donation, then you’ll get $5 or even $25. Few products offer that kind of margin. But the most important thing? – People just like buttons.
I would actually recommend not getting the above starter kit unless you are in a real hurry. I would wait, save your cash and get an all metal button maker that takes low cost, standard button parts. The starter kit mentioned above will make buttons for a few years but an all metal machine will make buttons for a lifetime – your kids could use it!!
Avoid Button Makers with plastic parts, avoid button makers made in China (expensive parts often with ugly plastic backs), avoid Badge a Minit (expensive parts, starter kits often fail), avoid interchangeable dies (impractical & expensive parts)
Here’s a link to a solid all metal button maker on Button Giant: http://buttongiant.com/collections/button-makers-and-diy-button-making-kits/products/1-1-4-button-maker-kit-with-graphic-punch-500-button-parts-includes-free-sample-pack
Here’s a link to an article about button making equipment: Checkout my button maker guide!
Hope it helps!
The Button Guy

A great button making kit for artists and designers
Read more »
Ponytail holders – Make Hair Elastics with your button maker December 08 2012
Syndicated blog from TheButtonGuy.net
The following article is reprinted with
permission.
http://TheButtonGuy.net/
The great thing about a button maker is that it takes you as far as your imagination goes. There’s so much you can do with a button maker and this article explains how to make ponytail elastics.
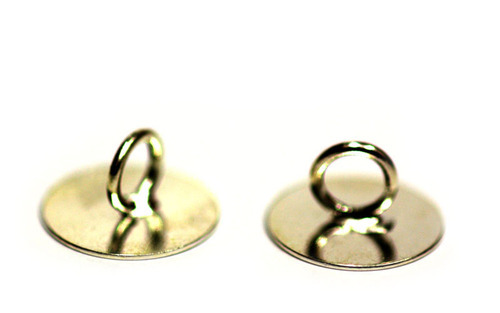
Most people make pin-backs with their button makers but center hole button parts are widely available. You need centre hole backs and then you need welded up eyes.
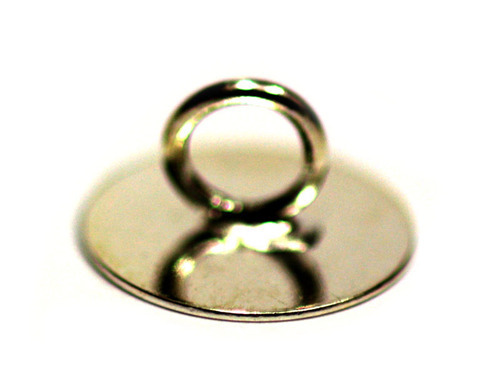
Welded up eye – Use with center hole backs to make ponytail elastics.
Once you’ve put your design on a centre hole button with a welded up eye poking out you can loop your hair elastic through the loop of the welded up eye. Bingo!
Where can I buy ponytail elastics – Best bet is your local dollar store.
Where can I buy centre hole backs and welded up eyes? In the US In Canada
Where can I get further info on how to make stuff with my button maker? Video’s
Read more »
How to make personalized gifts for Christmas with your Button Maker – Button Making Ideas! December 08 2012
Syndicated blog from TheButtonGuy.net
The following article is reprinted with
permission.
http://TheButtonGuy.net/
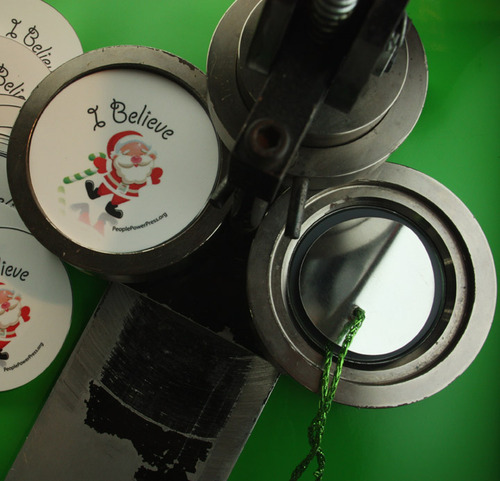
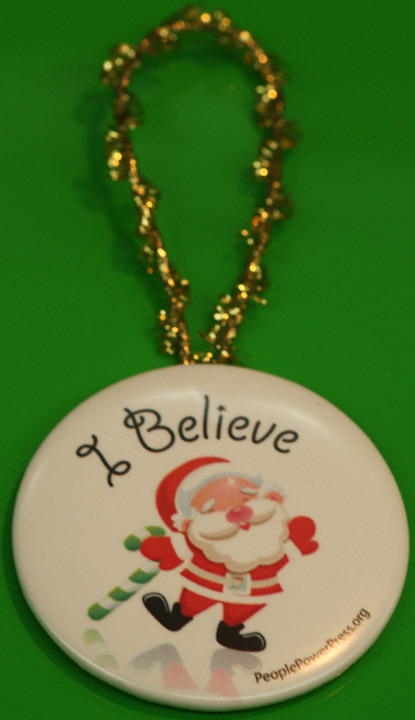
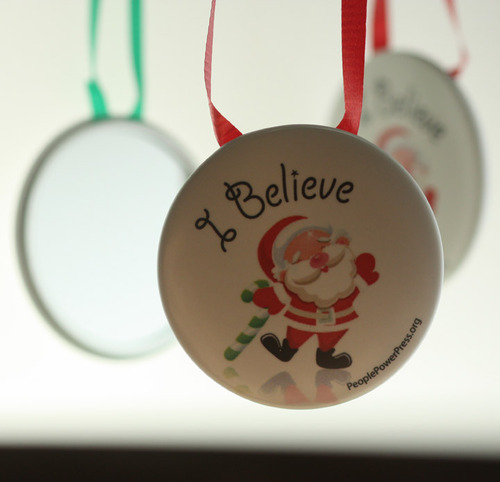
Personalized gifts for Christmas? What about hanging family photos in a mirror back button on the tree. Wow. Shiny!
It’s amazing what you can do with a bit of ribbon or elastic and a button maker. As always with buttons you need a good design – regardless what you’re making the design is key. Most of your effort and energy should go into improving your design but once you have a good design, you can easily make ……..in this case Christmas decorations that can hang on your Christmas Tree.
Firstly I chose to make mirror buttons with a Santa on the front. You could just use pin-backs or flat backs, they too will reflect the lights of the tree but I decided to use mirrors. To make mirror buttons you need a 2-1/4″ button maker or larger. 2-1/2″, 3″, 3-1/2″ all have mirror buttons as do 2″x 3″ and 2-1/2″ x 3-1/2″ buttons. Also oval buttons make great mirrors.
To make mirrors you need:
Here’s a video explaining how to make mirrors: http://www.youtube.com/watch?v=tXgRjUbir8k&feature=share&list=ULtXgRjUbir8k
Once you know how to make the mirror, you need to add the elastic or ribbon to let it hang in the tree. Here’s a few picks.
In the above example I made a hole in the shim and fed the elastic through. I had some issues with the metal shim cutting the elastic. I just made the hole with a pointed awl. But a lot of effort and not the best way.
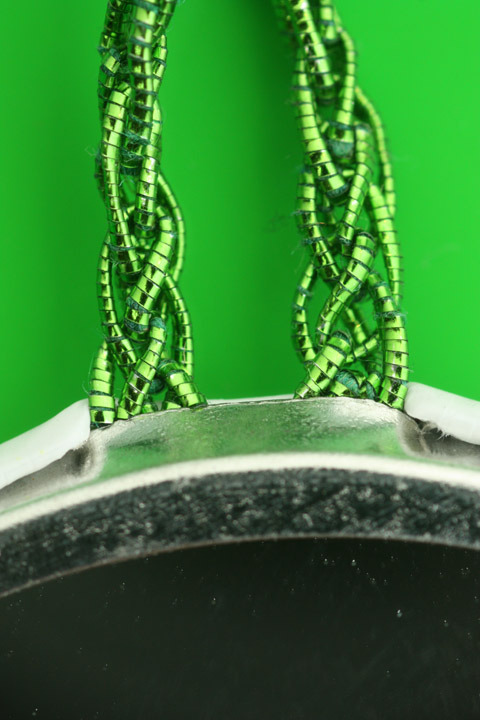
Even though in the above 2 images the mirror works and hangs on the tree well, the ribbon or elastic does not need to be super strong. But as you see in the 2 images above it does not look great, if you’re selling these you can see the elastic is not allowing the button to really crimp properly.
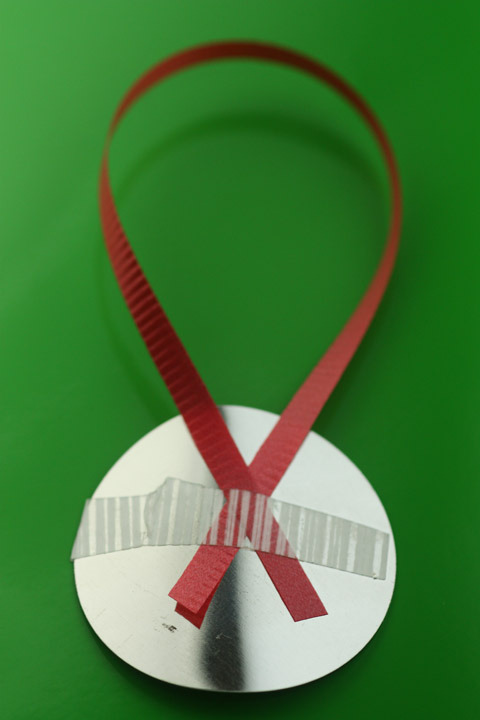
By using thin ribbon it works well, carries the weight and crimps the button properly. I also tried simply taping the ribbon to the back of the image. That worked well too.
As I said above the ribbon worked best producing a great mirror button for the Christmas tree.
If you’re selling these this is a great product to sell in sets. Any product that needs not just a single decoration but a hole set is great and if you have a tree full of these mirrors it’s going to be shiny!
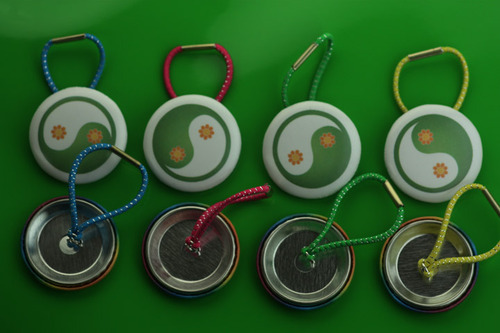
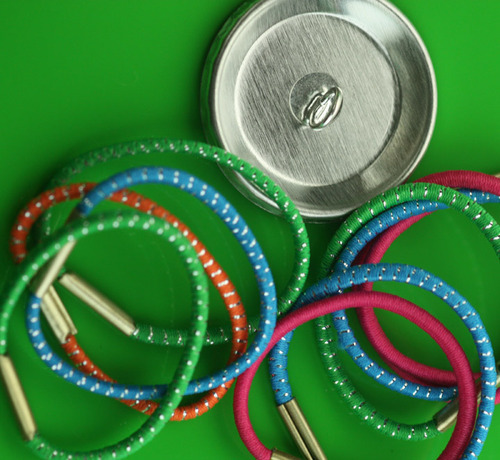
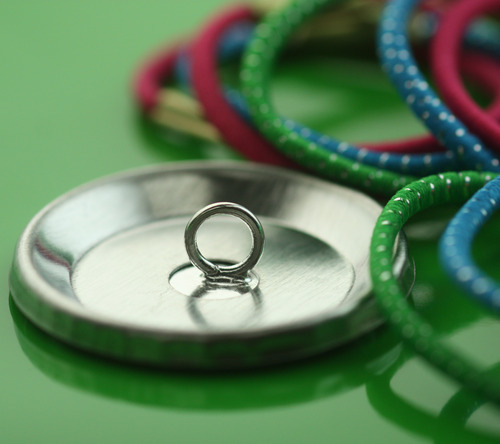
But if you want to get professional you could also use tabs and slot back buttons. These are usually used for pendents or key-chain buttons. Slot back buttons are available for 1-1/2″, 1-3/4″, 2-1/4″, 2-1/2″ and 3″ sizes. You can even get 2-3/8″ slot backs for badge-a-minit button makers.
This is what slot back buttons with tabs look like:
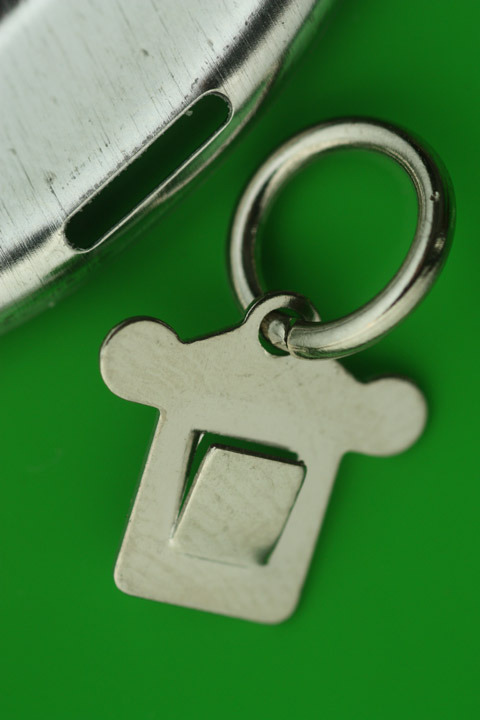
You can use the above to make professional looking Christmas Decorations and holiday season ornaments for the tree. Thread ribbon or elastic through the ring.
Happy crafting!
Read more »
Putting QR Codes on buttons or magnets – Why? How? December 08 2012
Syndicated blog from TheButtonGuy.net
The following article is reprinted with
permission.
http://TheButtonGuy.net/
QR Codes or Quick Response codes and buttons are a marriage made in heaven.
Pin-back buttons, pins, badges or whatever you call them are an ideal vehicle for promoting websites but what about a button that can be scanned on a cellphone and the image takes the cellphone user straight to your website.
QR codes don’t just need to go to a homepage, you can generate a QR code to lead a browser to any web address, to a special offer page, to a secret page or a surprise page. Follow a QR code button and see where you end up!

How to generate your QR code artwork for a button. There are dozens of free code generators online. Try this one or just search for one online.
What are QR codes
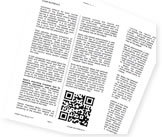
QR-Code in a Newspaper
“QR-Codes are two dimensional barcode (datamatrix) that is designed to have its contents decoded at a high speed.” source
With the technology of mobile phones constantly advancing, especially within mobile internet, QR-Codes are the perfect solution to quickly and efficiently bring mobile phone users onto the mobile web. QR-Codes can be used to store all kinds of data including web addresses. QR codes can also be used on:
- Buttons ( pins, badges)
- Fridge magnets, locker magnets
- Magazines
- Papers
- Business Cards
- Buses
- Signs
- T-shirts
How QR-codes Work?
Take a mobile phone such as an iPhone, android or blackberry or any phone with a digital camera. Take a photo (or scan) the QR code to capture a picture of the QR-Code. The in built QR-Code software decoder will then transform the data into an action by the mobile phone, such as:
- Connect to a web address
- Download a MP3
- Dial a telephone number
- Prompt your email client with a sender address
This is done in a millisecond making the transformation from a users mobile phone to the mobile web instantaneous.
How to put a QR-code on a button
Putting a QR-code on a button is not really different from putting anything on a button. You need a good quality artwork and you need a reasonable printer. Artwork can be generated online. Just decide on the url you want to link to, fill out a simple online form and most sites email you back a .png file instantly.
Try this free online QR-code generator
Layout your sheet as you would normally. Of course a square button is great, especially if you have a square button maker or if you are getting your buttons custom made by a pro, they will have a square button machine, but a round button will also work fine.
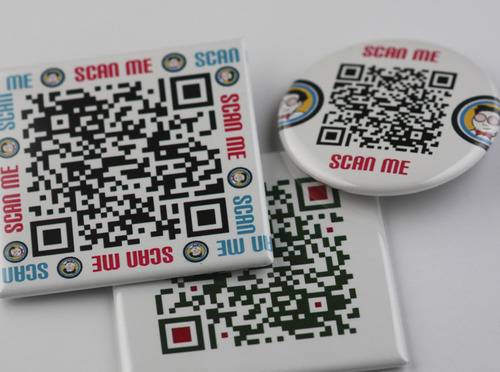
Add some text for the visual: What about “Scan me”, “Follow me” or “special offer”
You can use colour – they do not have to be black – but whatever you do TEST your qr-code before you make a bunch of buttons. Make sure your code works!!
Enjoy!
Read more »
I am an artist that attends various anime conventions throughout the year – What kind of button maker do I need? December 08 2012
Syndicated blog from TheButtonGuy.net
The following article is reprinted with
permission.
http://TheButtonGuy.net/
Hi Button Guy
I am an artist that attends various anime conventions throughout the year. I had made a post about purchasing a button maker, in Deviantart’s forum, and you answered it, which I recently responded to. I figured that you may not get on DA frequently so I decided to try and catch you this way. Seeing as I’m going to get a machine within this month.
What I wanted to know is if the T150 model’s 2-1/4 die could be switched out with a 1-1/4 die? The 2-1/4 size is great for the mirrors I’m seriously considering adding to my table but not as buttons. Most of the buyers I’ve had at conventions prefer 1 to 1.5 size buttons. So if the T150 can swap out then I’ll have a 2-n-1 machine, which is exactly what I need. Nat
Hi Nat
The above picture shows the T150 Hobby Kit for Button Making. It’s good value! But it is a hobby kit. Not a pro button maker. Unfortunately the T150 Button Making Kits do not have any options. I have only seen dies for 2-1/4” buttons.

You see the die is metal but the attachments on the Hobby Button Maker are plastic, if you’re knocking out buttons for your anime conventions or Comic-Con, how long will these plastic pieces last? I did not see anyone using a hobby kit at Comic-Con, San Diego or Comicon in Toronto or Vancouver
As an anime artist going to conventions I would recommend an all metal button maker anyway. And yes, 1”, 1-1/4” & 1-1/2” buttons are the most popular sizes for anime.
The higher price is a barrier, but in the long term the metal button maker will last years. I have a number of button makers at least 8 years old. The paint has scratched off, they have been extremely well used and they still make a button perfectly every time with little to no maintenance.
For anime conventions a button maker is a great addition to your product range, find a way to get a solid all metal machine and you won’t look back!
Cheers, The Button Guy
Website http://TheButtonGuy.net
Blog http://blog.TheButtonGuy.net
Directory http://Button-Guy.com
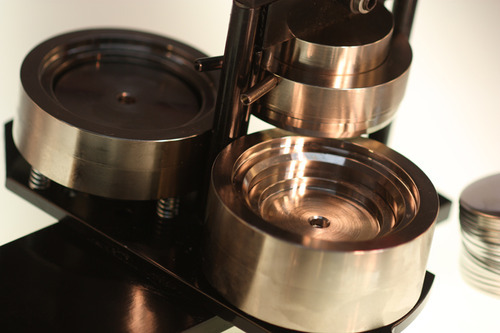
The above is a solid all metal button maker available from Button Giant or People Power Press. This is a pro machine suitable for anime conventions, comicon and serious uses. Look at the solid steel dies on this below: These machines just keep on going, they are precise, well made and worth the extra few bucks.
The perfect button maker, badge press, button machine, pin press or button making kit for anime conventions, fanexpo, comic-con, comicon or wherever you as an amime artist sells your art.
Read more »
Me and my friend have been looking into buying a previously established button making business we then realized it was more practical to start are own due to various reason such as shipping etc. We are first year University students........ November 29 2012
Syndicated blog from TheButtonGuy.net
The following article is reprinted with
permission.
http://TheButtonGuy.net/
Hi Liam
I would say there is no doubt that you can make money with a custom button business.
- You have the artwork skills, that is key.
- Do you have marketing skills?
- Do you have general common sense?
If you answered yes to the above 3 then you are well on the way to success.
Buying the button business is another discussion, it would depend on equipment and if you are still considering this you could call to get advice on the value of that equipment and the value of the business. A key here is to buy good and not obsolete button making equipment.
Also you mention you are on campus. University is a great place for selling buttons!!
Let me know if you want to discuss further.
Cheers, The Button Guy
Read more »
I've got a shell stuck up inside my button maker - button maker jam! November 17 2012
Syndicated blog from TheButtonGuy.net
The following article is reprinted with
permission.
http://TheButtonGuy.net/
I’ve had some sort of malfunction with the button
press, where the entire apparatus seems to have lifted
off its base.
Article:
How to unjam your button maker
- button making machine repair.
Read more »
I've had some sort of malfunction with the button press, where the entire apparatus seems to have lifted off its base. November 15 2012
Syndicated blog from TheButtonGuy.net
The following article is reprinted with
permission.
http://TheButtonGuy.net/
Button Maker Problemo
Hi Button Guy I came and scooped up one of two 2 1/4” button makers with my mom as you may remember. I’ve had some sort of malfunction with the button press, where the entire apparatus seems to have lifted off its base. I’m trying to make buttons with a heavier photo paper and it worked fine once, but this second time, it seems to have jammed the damn thing. Unless you have a secret tip to help dislodge the thing, perhaps I could bring the thing in and have it diagnosed. I’ve attached a picture of the press to show you what I mean. The press part won’t become disengaged from the dome side of the swivel. Thanks, John
Hi John This is a straightforward jam by the look of it. But you never know. It could mean you have more than one shell or mylar stuck inside or it could be your photo paper was too thick. I’m inclined to think it’s just the parts got doubled up inside.
You are welcome to swing by with your button maker and I will unjam your button machine. You could also checkout this video.
http://thebuttonguy.net/videos.html At the bottom is unjam your button maker - How to fix a button maker jam. Let me know if it helps. The Button Guy
Button Guy, you’re a genius! I should have consulted the videos straight away. Problem fixed. I just didn’t want to take a big hard tool to my wonderful button maker. But I suppose they’re designed for some hard goings-over! Thanks, John
Do go steady with your dies John. The inside of the dies are sensitive and yes they are solid metal button makers but you have to be sensible when using a tool to unjam the machine. You do not want to void the warranty or damage the die. Glad it got fixed quickly. Cheers The Button Guy
Read more »
How to make christmas decorations with your button maker. November 10 2012
Personalized gifts for Christmas? What about hanging family photos in a mirror back button on the tree. Wow. Shiny!
It’s amazing what you can do with a bit of ribbon or elastic and a button maker. As always with buttons you need a good design - regardless what you’re making the design is key. Most of your effort and energy should go into improving your design but once you have a good design, you can easily make ……..in this case Christmas decorations that can hang on your Christmas Tree.
Firstly I chose to make mirror buttons with a Santa on the front. You could just use pin-backs or flat backs, they too will reflect the lights of the tree but I decided to use mirrors. To make mirror buttons you need a 2-1/4” button maker or larger. 2-1/2”, 3”, 3-1/2” all have mirror buttons as do 2”x 3” and 2-1/2” x 3-1/2” buttons. Also oval buttons make great mirrors.
To make mirrors you need:
Here’s a video explaining how to make mirrors: http://www.youtube.com/watch?v=tXgRjUbir8k&feature=share&list=ULtXgRjUbir8k
Once you know how to make the mirror, you need to add the elastic or ribbon to let it hang in the tree. Here’s a few picks.
In the above example I made a hole in the shim and fed the elastic through. I had some issues with the metal shim cutting the elastic. I just made the hole with a pointed bradle. But a lot of effort and not the best way.
Even though in the above 2 images the mirror works and hangs on the tree well, the ribbon or elastic does not need to be super strong. But as you see in the 2 images above it does not look great, if you’re selling these you can see the elastic is not allowing the button to really crimp properly.
By using thin ribbon it works well, carries the weight and crimps the button properly. I also tried simply taping the ribbon to the back of the image. That worked well too.
As I said above the ribbon worked best producing a great mirror button for the Christmas tree.
If you’re selling these this is a great product to sell in sets. Any product that needs not just a single decoration but a hole set is great and if you have a tree full of these mirrors it’s going to be shiny!
But if you want to get professional you could also use tabs and slot back buttons. These are usually used for pendents or key-chain buttons. Slot back buttons are available for 1-1/2”, 1-3/4”, 2-1/4”, 2-1/2” and 3” sizes. You can even get 2-3/8” slot backs for badge-a-minit button makers.
This is what slot back buttons with tabs look like:
You can use the above to make professional looking Christmas Decorations and holiday season ornaments for the tree. Thread ribbon or elastic through the ring.
Happy crafting!
Read more »
How do I get people or businesses interested in getting buttons made or using buttons for fundraisers? November 05 2012
Syndicated blog from TheButtonGuy.net
The following article is reprinted with
permission.
http://TheButtonGuy.net/

Faisal asked
“I’m interested in button making and I design fanart too. How do I get people or businesses interested in getting buttons made or using buttons for fundraisers?”
Thanks for the question Faisal, it’s a big question and I will try to answer it here in short form and at the end I will link to other related articles that I have written. Cheers!
How do I start my custom button making business? How do I market my buttons? How do I start a button making business?
1. Create your tools.
2. Identify your market.
3. Create your marketing plan for your launch.
4. Consider timely or seasonal and ongoing strategies.
1. Create your tools:
Your tools are what you need when you walk in the door the first time to meet a potential customer.
Samples and Business Cards. Keep samples handy, that way when you see your friends, family or meet new people, you can give them one. They’ll probably compliment the design, at which point you can say “Thank you! I made it myself. If you ever need buttons for an event or business, let me know”. They might not need them right away, but they’ll have you in mind for when they (or someone they know) do. Better yet, make your samples double as your business card: put your contact info on a button and voila! You’ve got a button business card. It can be round, square, or whatever shape and size you want. If you make them as magnets instead of pinbacks, you have the added benefit of the free publicity you’ll get when they put it on their fridge, locker, etc. The 1-3/4” x 2-3/4” rectangular button maker makes great business card sized magnet or pin-back buttons. BUT REMEMBER: if that’s your card, people may ask for the same shape and size, so be ready to buy that machine – or limit your business cards to the size of the button maker you own.
You need a price list. That means an easy to read, single piece of paper with your prices. Give price breaks for larger quantities, but don’t go too cheap. No point making 100,000,000 buttons if you’re going to lose money (and time) on every single one!
You need a website. This can be a free site (such as WordPress). To start, make sure you have 2 pages: one that says who you are and what you do and the other with your contact information so potential customers can get in touch to place an order. Having a website with your address, phone, etc. increases trust while publishing prices online assures customers they are getting a fair deal.
2. Identify your market:
You have, in your question, identified fundraisers as a potential market. Who raises funds? Community groups, Non-profits, church groups and activist organisations. Start with a list of local groups that you wish to contact. Send them samples (5 buttons or magnets, or a mix of both, is more than enough) and a pricelist. If you see an excellent potential client, make them a personalized button and go and meet with them face to face (perhaps at one of their events!).
If you want to sell CUSTOM buttons (meaning, you use or create designs specifically for your customer):
Any local business is a potential customer, canvas your local business area or drop a business card button through the door whilst taking the dog for a walk. Local small businesses are your best bet when starting out, as big chain stores often buy at head office and not at branch level.
Don’t forget your friends: they are your biggest supporters, probably your first customers, and will be the happiest to tell other people that their friend is in the button making business. Create a personalized button for each of your friends (if they like Godzilla, give them a Godzilla button with their name on it). They will wear it, go forth and spread the word.
If you want to sell YOUR buttons (meaning, you want to sell your own art in button form):
Set up a booth at local farmers’ markets, flea markets, or one-of-a-kind shows.
Create an online store on etsy, ebay, or other online shop.
Do a “crowdfunding” campaign. Rockethub is a great company to help you with this and can give you more information. Simply put, you set a goal for the amount of money you want to raise (which can go towards establishing your button business: maybe you don’t have a machine yet, maybe you want to get another one) and then you promise your donors a product in return for their donation (which you give to them once your campaign is complete). This is a great way to a) get the funds you need to purchase your gear and, b) start establishing a word-of-mouth client base before your business even begins!
Identify potential resellers. Look for stores in your area that could resell for you and take it a step further: ask the local bicycle store if they want to sell bicycle buttons, ask the computer store if they want to sell nerd buttons, ask the pet store if they want to sell animal buttons / fluffy animal buttons / animal rights buttons. Then use your creative genius to design a set of buttons for them to sell. Either they buy a box of buttons from you or you negotiate a cut of consignment sales. Talk to them, get their ideas. For example, you could create 5-30 designs for them, laid out on a clean, professional looking board (or in a counter top box or jar) in the store and split the sale 50/50 with the store owner. You may have to settle with a consignment deal – meaning, you get paid when they sell (so you’ll have to keep an inventory and check in from time to time). But if the store owner allows a small add on the board that says “I Make Custom Buttons” and contact info, then it could be the beginning of something good.
NOTE: Match the buttons you create to your personality and the personality of the store (and owner) you choose to work with. If you’re an avid cyclist do cycle stores. If you’re a tech wiz do computer stores. YOU WON’T CREATE GOOD PRODUCTS IF YOU’RE NOT INTERESTED! Example: If you’re allergic to anything furry and hate animals it will be harder for you to identify with animal lovers, likely your buttons won’t be so good. If you’re an animal rights activist and want to make anti-cruelty buttons (and I’m 100% with you), there is still no point going to the local pet store that sells Chihuahua’s with pink bows if the store owner isn’t an activist. Put a Chihuahua with a pink bow on a button and you will win that customer. (Disclaimer: Here I apologize to all animal activists that have Chihuahuas with pink bows – I have a Pitbull that behaves like a Chihuahua and wears pink bows sometimes.)
3. Create your marketing plan:
A marketing plan for a new business usually means a $0 budget but there are still free online notice boards, free classifieds, crowd funding possibilities, trade/swop ideas and tabling event possibilities. Follow this simple list, add your own ideas and work through the list. That’s a plan!
Free classifieds: There are many local online noticeboards such as Craigslist and Kijiji. Just go in, use the free option and place some ads. Search for free classifieds online. Some newspapers allow free classifieds but keep it local to start. You can get into shipping, returns, credit card payments etc. later. This may bring an order or two but it’s a good place to start, you begin to formulate in your own mind why you are better, why people should use your service and primarily that will be because you are “local”. People like to deal with neighbours. Don’t just be cheap! Underselling products is a key reason for small business failures.
Tabling, Festivals, Street Parties, Yard Sales: Tap into your local community, what’s coming up? Setup a table at your neighbours’ yard sale. What about the Christmas fundraiser at the church. Does your local business community run a festival? Talk to the Business Improvement Association. Even if you go there and stand all day and sell just $50, next time your neighbour talks to someone they may just say, “I know someone who makes buttons.” Do not underestimate how much money you can make at a school or college lunchtime break if you can setup a table. What about a “Make your own button table.” Basically any public event is a potential button marketing event.
Birthday party events for kids: What about doing birthday party events for kids with your button maker? It’s simple to organize coloured pens, markers and pre-cut circles for kids to draw on. Don’t forget to take a few magazines or comics so the kids can cut out the stuff they’re into. Create a craigslist (or other) post specifically about your birthday party services and see what happens!
Trade / Swop: You’re starting out, you have no cash – what if the local church wants $30 for a table – offer them custom buttons instead. If a local business is willing to trade products or advertising in exchange for buttons, that could be a good way to get the ball rolling and lower your start up costs.
4. Consider timely / seasonal and ongoing strategies.
Whether it’s for the launch of your business or for ongoing business you’ve got to be timely and seasonal. As I write, Christmas is looming. So why not offer to put family pictures on a button for people to give out as Christmas gifts or include with their yearly Christmas cards? In the Spring you want to be thinking about Summer events/festivals and planning ahead.
Here’s a simple framework – I know it’s not rocket science – for how a button maker should be thinking and preparing:
Spring: Summer events, street festivals, beer gardens, yard sales
Summer: Back to school
Autumn / Fall: Halloween, Harvest Festival, Kwanzaa, Hanukkah,
Winter: Christmas, Holiday Season, New Year, New Year Resolutions, Valentines
All year round: Birthdays, Marriages, Funerals, Graduations, Births. Also new movies, trends (QR codes), comic books (any new Marvel release) and then the humdinger of them all: ELECTIONS at every level: local school or National Presidential elections all need buttons!
Some final words for reflection and advice:
Starting ANY business takes a lot of legwork to get it up and running. The most effective advertising is ALWAYS word of mouth. Do a good job for each customer and they will become your ‘sales representatives’. It may go wrong occasionally (don’t ignore it!), do what it takes to win that customer back (but remember that once in a while you’ll run into a client that can never be pleased. Don’t take it personally). Go a step further for your customers: Under promise and over deliver. Establish your customer base and as long as your service and product is good (and fills a need) it will grow naturally without expensive advertising. Be creative. Don’t try to get too big too quick, steady as she goes and I wish you luck with your new button business!
Read more »
Using thick Photo Paper in a button maker? Creating photo buttons with my button machines. October 20 2012
- Robert: I am wondering if there is an adjustment I can make to use photo paper (thick) in a button maker. I would use photo paper exclusively so it could be set up once and left that way. Right now I have some of the badge parts inc machines. Thanks for you help
- The Button Guy: Hi Robert First thing is size? What size photo buttons do you want to make? Depending on size you may just need to cut your image slightly smaller. That could mean buying a graphic punch sized for photos. Depending as well on what make of button maker you have. The manufacturer can reset some of the sizes, tolerances on your machine but this may be more expensive than just getting a photo button maker, ready sized for photos. So let me know the button size and I’ll let you know what you need to do.
- Robert: I have a 1 3/4x 2 3/4 oblong model 700 maker from badge parts inc. Is the work on the machine something I could do? I’m pretty handy and have access to lathes, mills etc. Thanks
- The Button Guy: I do not have a 1-3/4” x 2-3/4” oblong machine from Badge Parts here and I know Joe at Badge Parts does not make all his machines standard so I do not know the exact size. But you could ask Joe at Badge Parts if he can reset the machine. A simpler and cheaper solution is to change the cut size of the cutter. This you can test with scissors. Cut your photo paper so it is not the normal size you would use for a button but cut it smaller so the paper fills the front of the button but does not fold around the back. Experiment with this and you should find the size you need. You want to fill as much of the front of the button as you can but not go around the back. The mylar which is normally the same size as the button image will be larger in this case. The mylar will hold your paper in place. Then make or get a die maker to make you a die that cuts the special size and you’re done. With my 1-3/4” x 2-3/4” oblong machine I can put quite thick paper, even fabric in it anyway but as I say it’s a different manufacturer and possibly a different size.
The two photos show the same button maker. The first shows a circle cut for a photo button. The second shows a circle cut for a standard button.

- The Button Guy: Generally speaking button makers can mostly make buttons with relatively thick paper but seeing as most photography is digital today and can be printed on standard 24 lb paper it is quite rare these days to find specially sized photo button makers and photo circle cutters. In most cases as I mention above the solution is just to cut the paper smaller than the mylar so that the paper does not need to fold around. Thicker paper tends to tear on the edge as some fabric does when it is pressed around the button. Sizing the image to the front of the button will normally solve the problem. There are some “specially” sized photo cutters or graphic punches that do just that. They are available for 2”, 2-1/4” and 2” x 3” buttons.
Note how this circle fills the full die whereas the photo button cut above only fills the inner circle of the button maker. This is the same button machine.
- What the smaller cut size of a PHOTO CUTTER does is match the inner circumference of the button maker allowing you to still centre your image.
- There are also some photo button makers in 3”, 3-1/2” and 4” but my advice would be to print your photos on thinner paper and get standard button maker/ cutters. The special photo papers are covered up by a layer of plastic anyway. So there is no great advantage and they are certainly more expensive than standard papers. The best paper for button making is ultra white 20 lb paper.
Read more »
Are you familiar with the Artec Button Maker? October 17 2012
Melissa: Are you familiar with the Artec Button Maker? I can't find anything about it anywhere...excepts its listings on ebay. Thank you!The Button Guy: The Artec Button Maker is something I have not heard of. I looked at the ebay pictures and I see it has the standard dies and base of any of the run of the mill Chinese button makers with a fancier handle. This probably means that whilst they call it a 1-1/4” it will in fact be a European size 38mm machine. If this is the case the biggest issue is the button parts tend to be expensive. Whilst I have never tested this particular machine it looks identical to Chinese button makers I have tested (apart from the handle) and the other issues are you see it has a white plastic base for the dies. This will wear and after a while often does not line up with the top die anymore. These machines certainly do not have the longevity of a solid metal made in USA button maker which usually will still be good in 20 years.
But back to the main issue: Expensive button parts but not only that, the Chinese button parts are a bit cheesy, very light metal, plastic backs for some sizes, stick on pins sometimes, depending on size and generally just not as cool as your standard Made in USA button. Note the white plastic backs in the photo! The difference in quality of the keychains, fridge magnets and mirrors etc these machines produce are worlds apart. But none of these are included in the kit anyway.
So if you want a low volume hobby kit it could be an option but then when I look around you can get a T150 machine that takes standard, low cost buttons for under $200: http://buttongiant.com/collections/frontpage/products/2-1-4-t15o-button-maker-hobby-kit-circle-cutter-250-button-parts-and-free-sample-pack
But if you’re more serious about button making I would recommend an all metal American made machine but you will need to spend $300 or more!
Read more »
Hi Button Guy! Can I refrain from using Mylar material? Can I use thin fabric with beautifull patterns instead of printed paper design? And most of all I wonder how much pressure will be applied on the fabric since it has fragile particles that could be d October 13 2012
Hi Vlad
Yes you can make buttons without mylar. But not all fabric is suitable for making buttons. You need fabric with a high tensile strength. Otherwise tearing can be a problem, buttons tear at the edge.
The only way to go is to test a piece of fabric. The button making process does not put alot of pressure on the fabric so I don’t think that’s a problem, but like I say……TEST a piece of the fabric that is less important. Use a piece of mylar as a guide for cutting your fabric with scissors unless you have a rotary cutter. Graphic punches that often come in button making kits do not work with fabric.
Let me know how it goes.
Read more »
Question: What's a good button maker for magnets and will it actually hold a piece of paper to the fridge? October 09 2012 1 Comment
What's a good button maker machine and how much paper does a button magnet / fridge magnet hold up on the fridge?
Kim: Thanks for your website. Still need help. Looking for a nice machine that I would use mainly for fridge magnets. Also what magnet to use that will actually hold a piece of paper like on the fridge. Have had some that can't do it.
The Button Guy: What size magnets are you making? Even if you are undecided, give me an idea. The 1” round machine is small but with a ceramic magnet will hold up to 7 letter size photocopy sheets on a fridge. Whereas the standard 1” sticky back magnets will only hold 3 letter size sheets on a fridge. But you may be talking 2-1/2” x 3-1/2” so let me know a size.
Kim: Thanks for such a quick response. I am thinking larger buttons like the 2 1/2".
The Red and black machine is great for magnets.
 The Red and black machine is great for magnets.
The Button Guy: 2-1/2” has magnets and holds 7 sheets of letter size paper on a fridge. This is with the 4.5mm improved magnets from Button Giant. The standard 3.3mm magnets that most vendors have hold 4 sheets. (Will vary a bit according to fridge). Here’s a link to the parts page for 2-1/2” on Button Giant. http://buttongiant.com/collections/button-parts-for-button-making/products/everything-for-your-2-1-2-button-maker They have 2 button maker kits: http://buttongiant.com/products/2-1-2-button-maker-kit-500-button-parts-includes-free-sample-pack Or with the graphic punch: http://buttongiant.com/products/2-1-2-button-maker-kit-graphic-punch-incl-500-button-parts Let me know if you have further questions.
Kim: Thanks Button Guy
The Button Guy: No worries and here's a link to a YouTube video: How to make a button magnet
Read more »
Making Pin-back Button designs with MSWord #1 - How to design a... October 07 2012
Making Pin-back Button designs with MSWord #1 - How to design a Simple Text Button using templates
Button making is easy. Design is not and a good design makes a button. A button with a great slogan but poorly designed will not work. Focusing on the design of a button is important and I would recommend using Photoshop, Illustrator, Gimp or any real graphic design program. But we are not all designers and sometimes you have to use something like Microsoft Word.
This video shows you how to setup a simple button design using MS Word. There are 3 videos in the series.
Other videos in this series:
#2 - Making Pin-back Button designs with Word #2 - Using columns to centre graphics link
#3 - Making Pin-back Button designs with Word #3 - Adding images and graphics link
Read more »
Putting QR Codes on buttons or magnets - Why? How? October 07 2012
QR Codes or Quick Response codes and buttons are a marriage made in heaven.
Pin-back buttons, pins, badges or whatever you call them are an ideal vehicle for promoting websites but what about a button that can be scanned on a cellphone and the image takes the cellphone user straight to your website.
QR codes don’t just need to go to a homepage, you can generate a QR code to lead a browser to any web address, to a special offer page, to a secret page or a surprise page. Follow a QR code button and see where you end up!
How to generate your QR code artwork for a button. There are dozens of free code generators online. Try this one or just search for one online.
What are QR codes
QR-Code in a Newspaper
“QR-Codes are two dimensional barcode (datamatrix) that is designed to have its contents decoded at a high speed.” source
With the technology of mobile phones constantly advancing, especially within mobile internet, QR-Codes are the perfect solution to quickly and efficiently bring mobile phone users onto the mobile web. QR-Codes can be used to store all kinds of data including web addresses. QR codes can also be used on:
- Buttons ( pins, badges)
- Fridge magnets, locker magnets
- Magazines
- Papers
- Business Cards
- Buses
- Signs
- T-shirts
How QR-codes Work?
Take a mobile phone such as an iPhone, android or blackberry or any phone with a digital camera. Take a photo (or scan) the QR code to capture a picture of the QR-Code. The in built QR-Code software decoder will then transform the data into an action by the mobile phone, such as:
- Connect to a web address
- Download a MP3
- Dial a telephone number
- Prompt your email client with a sender address
This is done in a millisecond making the transformation from a users mobile phone to the mobile web instantaneous.
How to put a QR-code on a button
Putting a QR-code on a button is not really different from putting anything on a button. You need a good quality artwork and you need a reasonable printer. Artwork can be generated online. Just decide on the url you want to link to, fill out a simple online form and most sites email you back a .png file instantly.
Try this free online QR-code generator
Layout your sheet as you would normally. Of course a square button is great, especially if you have a square button maker or if you are getting your buttons custom made by a pro, they will have a square button machine, but a round button will also work fine.
Add some text for the visual: What about “Scan me”, “Follow me” or “special offer”
You can use colour - they do not have to be black - but whatever you do TEST your qr-code before you make a bunch of buttons. Make sure your code works!!
Enjoy!
Read more »
Maintaining & lubricating a button maker August 28 2012 1 Comment
Maintaining your button machine.
Button makers, or at least the good ones require very little maintenance. Remember a good button maker is all metal, NO PLASTIC PARTS!! I have a number of the Tecre style button makers that are 10 years old, they have made trillions of buttons and work with very little maintenance. But these are smaller button sizes, 1” or 1-1/2” round. I also have larger button makers that need more attention and certainly need silicon lube. This is just a smear of lubrication every 500 buttons or so. It’s cheap, quick and just becomes a habit. If you have a button maker you definitely need to get some silicon lube. This can also help and certainly does not hurt a smaller button maker.
Relevant question from a customer:
“I’ve used my button maker to make buttons since purchasing it from you, and I noticed upon pressing my latest set that the machine isn’t wrapping the mylar tightly around the edges of the button at the very top of every couple of buttons I make. There is a little bubble of empty space between the edge of my button and the mylar itself. I’ve double checked that I’m not putting in double sheets of mylar or anything, and I’m using fairly thin paper (28lb) for the designs… What could be causing this? Thanks for your help!
The question above is certainly a likely candidate for silicon lube. Mylar problems are often caused by need for a little lubrication I would recommend visiting your local hardware store or buy a stick of lube online. the button guy

HOW TO USE SILICON LUBRICATION ON YOUR BUTTON MACHINE.
1. Do not use oil, WD40 or anything but a clean silicon lubricant. Some people use silicon in an aerosol but for the button makers I find stick lubricant works better. This is to protect your images and your buttons. Grease or oil stained buttons will not do well!! Keep your button maker clean!
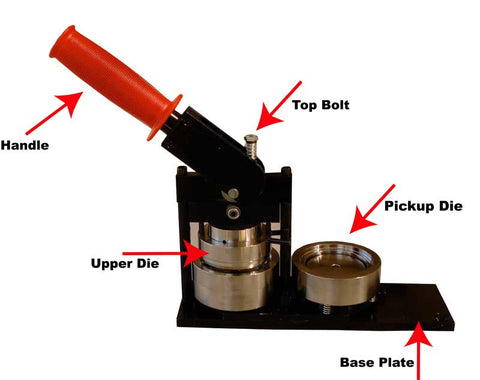
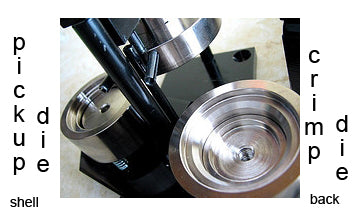
2. Identify the crimp die in your button maker. (See image below) Regardless of style or make of your machine you will have a crimp die where you put the pin-back in. (The pickup die is where you put the shell, image and then mylar) Most crimp dies have a 45 degree surface just visible above where the pin-back goes in. This is the spot! Just put a bit of the stick lube on your finger and rub it around the crimp die. Think of it more as massaging it in as to just smearing it across the surface. The purpose is to fill microscopic damage to the die making it smooth to allow the mylar to pass easily across the surface on the second press.
That usually does the trick and in normal circumstances will be enough. If you have very serious problems or you picked up a used button maker that’s been in an attic for 25 years you could:
3. Slide or rotate the lower dies to allow easy access to the upper die. Using a silicon lubricant stick just put a little on your finger as if you were using lip balm, chapstick or lip gloss. Apply a modest smear to the perpendicular walls of the upper die. Massage the lubricant all the way around that upright wall of your upper die. Just enough to leave a thin film of silicon. No need to use much.
4. Go through the button making motion a couple of times to get the lube where you need it. Then make a button as normal. The first button or maybe two will need wiping with a clean cloth. After that your back in business.
5. Repeat every 500 buttons or as necessary. This maintenance requires very little lube. 1 lube stick will last a lifetime.
6. Another problem solver option for older or damaged button makers is to make sure the dies are clean, free from rust or paper, metal or plastic debris. You can use a cloth or if you’ve got it: compressed air to clear away the grunge. Then soak the dies with the more liquid style aerosol can silicon lubricant and then wipe clean with a clean dry cloth. Search the die for metal burrs and damage. Clean up any damage with very fine emery paper and then clean the die again with liquid silicon to remove any metal dust.
7. Sometimes an older red and black Tecre button maker grinds a bit when it swivels. DO NOT USE WD-40. Using lithium grease, available from any hardware store you can grease the base plate with a smear of silicon grease between the die carrier plate and the base plate. Just smear the base and swivel getting the grease between the two plates.
WHERE TO BUY SILICON LUBRICANT
Lube sticks are available at dollar stores and are inexpensive.


Read more »
Flat Button edges - Third Press Operation - How to flatten button edges. July 27 2012
Flattening Button Edges is only possible with the 1”, 2” and 6” sizes only.
Why would you want to flatten the edge of the back of a button. Well for the 6” it makes the clocks look better. For the 2” it is particularly popular with people that make rosettes and also medallions (pendents and game pieces). With the 1” too medallions look better and are easier to stick. You can make a hole using a “Key-chain Punch” and put them on a chain or keyring. You can also use a sticky pad, double sided tape or glue. These are also used widely for game pieces.
This is not the same process as flattening the front of a button as is done with 3-1/2” coaster buttons.
When using the Third Press Operation have a rare earth magnet (or strong magnet) to get the button out of the die. It really helps.
Technical details - Medallion Back Buttons - Third Pressing Operation
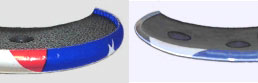
When a button is made with a plastic flat back such as those used for medallions, the rim of the button is crimped at approximately a 45 degree angle. This leaves a flange extended inward and away from the flat back as shown in the lower left picture.
The Third Press Operation is unique to the red & black button makers. This process allows the 45 degree flange to be pressed down onto the flat back so a more secure and flat crimp is obtained. This is shown in the lower right picture. The Third Press Operation is currently available for 1”, 2”, and 6” button sizes.
Flat back buttons can be mounted directly onto plaques, trophies, and other applications with a two-sided peel and stick foam disks. “
See the difference?
- Assemble a button without a pin installed in the back. There is no room in the button assembler for pins during the Third Press Operation. Adhesive pins can be attached after the button is complete.
- Return the button face-up into the pick-up die cavity of the button assembly machine (where the shell, graphic and mylar were first placed when the button was made).
- Pull the press handle to the lower limit of its stroke to flatten the edges of your button. If you are using a manual machine the third press will require more force than the previous strokes of the handle.
- Attach an adhesive pin to the button or use a peel & stick foam disk to mount the button on a trophy, plaque or medallion.
Read more »
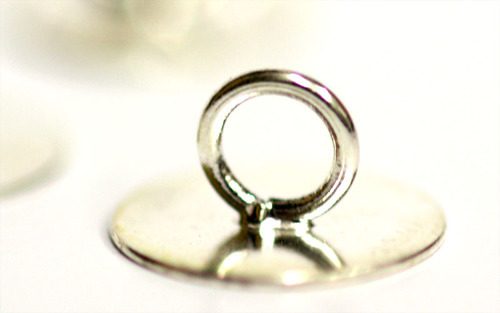
Welded up eyes - A cool accessory for button makers! July 23 2012
Welded up eyes? - What are they? How do you use them?
I think welded up eyes are an underestimated, under-used little accessory for button making. They are a small metal ring with a backing plate. Think of any pin-back button and the holes on the back of the button: welded up eyes can be inserted through the hole in the back - pressed in the button maker for permanence and used to attach key-chain, pendant, ponytail holder or any other accessory. A welded up eye can make a button attachable… to almost anything.
Read more »
How to make a pin-back button: How are buttons made? July 19 2012
How to make a pin-back button: How are buttons made?
Read more »
Starting a button making business from home? - Do I need insurance? July 17 2012
The insurance question pops up pretty frequently. You are starting a button making business at home: when do you get insurance? What are the liabilities for a home business? If you make the buttons at home and sell at events or to stores, do you need insurance.
The quick answer is that strictly speaking you do need liability insurance and I know this is not the answer you wanted to hear. If you are selling a product in stores, online or at events you do have liability exposure that you may want to cover but a business policy is costly for a small business just getting going ($1000 + per year) and not everyone uses their button making business as a full time business but that makes no difference to the price even if it is part-time.
Most home insurance companies will do a small business insurance extension to a home policy for $200 - $350 per year. If your insurance company does not allow button making as a home business then try a different company or get your broker to look around. You should get the additional coverage for the aprox $250 a year.
Do consider that in the research & development stage or whilst making samples and developing your business plan for your button making business you do not need liability insurance. As soon as you start selling you do need business insurance.
Many people have of course worked from home for years and never had insurance. Some event organisers will want a copy of your liability insurance as part of the application for vending but THE MAJORITY DO NOT in my experience.
The events that usually require liability insurance are the larger commercial events or events run by the city, province, state or municipality. These are often the better events for sending so there may be no way around the insurance issue.
My personal experience is that I did not get insurance for a couple of years, whilst I was setting up my business. I suppose I took a risk and I was lucky. If you ask a financial adviser, insurance broker or lawyer, they will tell you to get insurance. If you can afford the lawyer you can probably afford the insurance.
This article was written in response to multiple questions over time on the insurance question:
Hi Button Guy, I’ve got a strange question for you and hope you’ll be able to answer it.
I’ve ordered 2 button makers from People Power Press and love them. (2.25 and 1” models) I bought the machines so I could make some “environmental” buttons and have had a lot of fun making a bunch of environmental ones and others as well.
I want to sell buttons, mirrors etc. at our local craft fair (and anywhere else I may be able to), but to do so, I had to get a business licence from the municipality. I did that ($75 a year), but they also require that I have liability insurance.
Our home insurance carrier will not allow us to add my “business” to our policy as a home based business (the $250 a year option). They say that making buttons at my kitchen table and selling them is too risky because of choking and pricking hazards to customers. Apparently I need a business liability policy costing approx $1000 a year. If I choose to have a website, that might be higher. Their reasoning being that I might attract business from other countries and different laws would be in effect. Crazy, eh? Especially since I doubt I’d make more than $1000 a year.
Thanks to Ryan Mitchell from Mitchell Sandham Brokers for his input on home and small business insurance. http://www.mitchellsandham.com/
Read more »
Do I need a circle cutter if I am buying a button maker? July 10 2012
People ask me all the time if the circle cutter is necessary when buying a button maker. Do I need a graphic punch to make buttons? What is the graphic punch for?
No you do not need a graphic punch or circle cutter to make buttons. You can cut circles with scissors. A button made with a circle cutter or graphic punch looks identical to a button cut with scissors when finished. The difference is the time it takes to make the button or more relevant the number of buttons you wish to make at a time. If you’re making a few buttons at a time, up to say 20, you can do that with scissors. Once you start thinking you need 100 buttons in an hour that will be difficult with scissors - and not much fun. If you need 1000 buttons in a day: impossible but certainly doable with a graphic punch.

If you are doing “make your own button” events, tables or workshops with kids then you also do not have to get a circle cutter. Better to buy pre-cut circles to match your button maker. I know People Power Press sell the pre-cut circles here: http://peoplepowerpress.org/products/copy-of-mylar-bulk-mylar-for-button-making
There are different kinds of circle cutters. I recommend the graphic punch from Tecre for speed and excellent centering. (See picture above) Good centering is key, when buttonmaking! http://peoplepowerpress.org/search?q=graphic+punch If you are doing low volume circle cutting or if you buy pre-cut circles and just want a circle cutter for occasional and not volume use then this is a reasonable cutter for $20 - (You do get what you pay for) http://peoplepowerpress.org/products/hobby-cutter-adjustable-for-circle-cutting
 Inexpensive hobby cutter
If you are considering getting more than 1 button machine and looking to save money. Say you have your eye on a 1” button maker now but further down the road maybe a 2-1/4” then an adjustable cutter makes sense. Not if speed is your driving force, graphic punches are faster, but a well priced machine that cuts multiple size circles is the adjustable rotary punch: http://peoplepowerpress.org/products/adjustable-cutter-for-circle-cutting-for-multiple-button-makers A big plus for the rotary punch is that it cuts fabric!!! A lot of people make fabric buttons - without mylar so you get the fabric texture and graphic punches do not cut fabric.
 Adjustable Rotary Circle cutter
Any feedback on your experience with circle cutting and/or this article welcome!
Read more »
How to "Tune-up" a Tecre, red & black, button maker. April 03 2012
How to “Tune-up” a Tecre, red & black, button maker.
Firstly I personally do not believe in fixing stuff for the sake of it. Fiddling with or dismantling your button maker is a bad idea. These button machines are solid and well made and have a warranty - if it ain’t broke, don’t try to fix it!
So these button machines have proven to be extremely reliable, doing a little preventive maintenance, from time to time, can help to keep your machine operating smoothly If used with care the following information will show you how to “tune-up” your button maker.
If for any reason you are uncomfortable following these instructions, give us a call or swing by and we will make arrangements for you to return your machine and have us do the tune-up your machine for you.
Don’t simply try to pry apart the dies, if you have it jammed, as you will likely damage the dies.
Also, DO NOT attempt to dis-assemble your machine, as you most likely will be unable to re-assemble it and have it work properly and may well damage it in the process.
Doing maintenance on your button making machine.
To do a tune-up, you will first need to gather a few items. You will need:
a 7/16” wrench, a can of silicone spray lubricant, a 3/16” allen wrench, and paper towels.
Step 1: Spray a small amount of silicone spray at each location marked by the arrow, in the photo below. (If you use too much silicone spray, it will end up on your button designs, which won’t be good).

Step 2: Now take the handle and work it up and down 5 or 6 times. You want to work the silicone spray down into the upper crossbar that the two bolts go through (shown in the photo below) Also spray a little silicone where the handle attaches to your button machine. Do so on the other side of the handle, as well (not shown).

Step 3: Rotate the pick up die and crimp die so they are positioned as shown in the photo below. Take the paper towel you sprayed with a small amount of silicone spray and rub it around the beveled edge of the Crimp Die. Doing so will help prevent an issue where the mylar disc doesn’t crimp tightly and has a bit of a “bubbled” look at the edge of your button. The silicone spray allows the mylar to slide smoothly.
You may repeat this last step anytime your mylars don’t seem to be as tight as they should be..
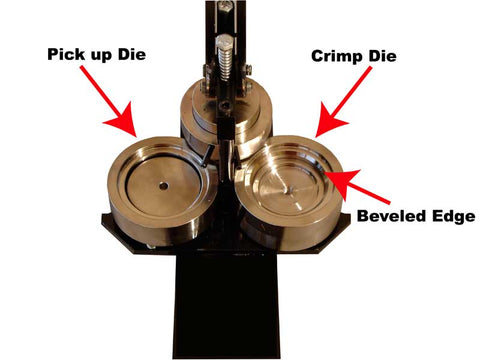
Stick lubricant works very well if you are having issues with the mylar not crimping properly.
Stick lubricant available in your local hardware store or also online: here.
Step 4: Now rotate the pick up die so that the upper die is located directly above it. Then push the handle down all the way so the upper die slides into the center of the pick up die (not shown).
Step 5: Next, take the 7/16” wrench and tighten the two top bolts (shown below) until they are both snug. DO NOT overtighten these bolts, as doing so will damage your machine.

Step 6: Now spray a small amount of silicone spray onto a paper towel and spread it around the outside of the inner plug on the upper die (shown below). Doing so will make it easier for the outer ring to slide up and down during the button-making process.
And spray a little silicone spray on the base plate on which the dies rotate (shown below). Doing so will make it easier for you to rotate the dies as you are making buttons. Again, not too much or you will get it on your hands and on your buttons.

Step 7: Now turn your machine over and use the 7/16” wrench to tighten both brass colored bolts (in the photo below). Make them tight, but DO NOT overtighten them, as doing so will damage your machine.

Step 8: And finally, find an allen wrench that fits inside the “Flat Head Bolts”. First slightly loosen the Flat Head Bolts (see image above) and then snug them down. DO NOT overtighten them, as doing so will damage your machine.
That’s all there is to it. Your button machine should now work as good as new!
If it doesn’t, or if you are uncomfortable following these instructions, give us a call and we will make arrangements to have you return your machine to us and we can do the tune-up for you.
Under no circumstances should you attempt to dis-assemble your machine.
Read more »
How to “Un-Jam” your Tecre button making machineBefore we get started with the... April 03 2012
How to “Un-Jam” your Tecre button making machine
Before we get started with the instructions on how to un-jam your machine, take a look at the photos below and familiarize yourself with the names of the various parts of your button machine. Doing so will make it easier to follow the step by step instructions.
Jamming a button maker is very easy to do. You can get a jam if you don’t notice that two shells (fronts) or two mylar are stuck together. Another thing that happens is that after you have put a shell image and mylar into the top die using the first press you get distracted….. the phone rings and then you go back and load the first die again, you press and kathump! You’ve got a jam.
So as I say, it’s easy to jam a button maker and it’s not too difficult to unjam it. Read on……
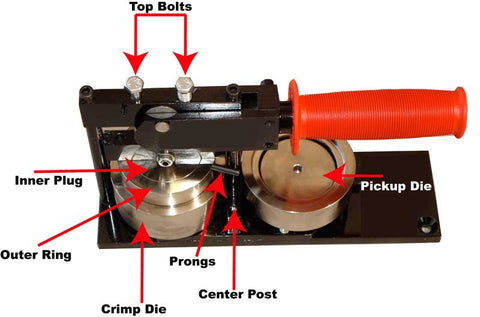

Unjam your button machine
If your button machine has jammed, the information below will show you how to free it up.
In attempting to unjam your machine, DO NOT use a hammer or screw driver to pound or pry the metal parts of your machine. Doing so WILL damage your your dies!!
If you are unable to unjam your machine, or are uncomfortable following the steps listed below, you can swing by or return your machine to our office and have us un-jam it for you.
The three most common reasons that can cause a machine to jam are:
A. Placing more than one shell (the button front) into your machine.
B. Placing more than one mylar disc (the plastic) into your machine.
C. Going back to your button maker and forgetting that you already have a shell in the upper die.
You can sometimes “un-jam” a machine simply by moving the handle up and down several times in rapid succession.
If you are able to do so, try rotating the dies (without using force) so the upper die is above the crimp die (the die that holds the button back). Then move the handle up and down 5 or 6 times. If that action is going to free up your machine, 5 or 6 times should do the trick.
If it doesn’t, or if you are unable to rotate the dies without using force, proceed to the next step.
If the previous step didn’t work, the upper die is unable to return to it’s normal position because a button is stuck in the upper die. And because the upper die is “stuck in the up position” you are unable to rotate the dies.
So what we need to do is to free the upper die assembly.
I recommend using the following strategy to accomplish this.
Take a piece of wood, such as a 1” x 2”, 2” x 2”, or a thick wooden dowel) and with your button machine sitting on a table or counter, position the piece of wood so it sits on top of the “Outer Ring” but doesn’t cross over to the “Inner Plug”. Hold the piece of wood length-wise and use a hammer to tap the edge of the wood (NOT the machine itself). What we are attempting to do is separate the outer ring from the inner plug. Doing this should loosen the stuck button part from the upper die.
It is recommended NOT TO FORCE OR PRY the dies apart, as this will damage them. Ease them apart without damaging your die.
Hopefully, this will have freed the jam and the dies can now swivel but you may still have button parts jammed up inside the upper die. These need to be removed. If you put your finger up inside the upper die you should be able to feel the screw hole. If it’s smooth you still have a button inside.
An awl is useful for removing jammed buttons also try this article.
Read more »
How to fix a button maker - button maker jam - how to unjam your button machine March 25 2012
Read more »
How to create the 3d look for your button artwork. March 25 2012
I found an article online that explains how to create buttons using Photoshop. This is not how to create button artwork, not how to complete a template to create buttons - BUT IT IS HOW TO CREATE great 3D button images for advertising your buttons in your online store. They have to have a great 3d feel. They must look like you can pick them up. Here is a method using photoshop to do that.
Don't use this artwork tutorial to make buttons but use it to advertise buttons on your blog or website. Note the 3d feel in the buttons below.

Actual artwork that you print out to cut and put in a button would look like this:
 The outer line is the cutline. Some of the outer area will be lost as it folds around the back of the button. The final button will be this size:
 Some of the area outside the black line will be visible on the finished button. The gloss and shine on a finished button comes from the mylar or plastic that covers and holds the button together, making it waterproof. The curve of the finished button helps the shine and is of course actually 3d.
This tutorial will illustrate you how to create some little Buttons in Photoshop using a couple of layers and one interchangeable image layer. You can also download the needed the sample PSD at the bottom of this tutorial.
This is a simple task designed mainly for the beginners. So they could finish this task in only 30 minutes. So let’s jump into this awesome tutorial and get benefited!
Tutorial Details
- Program: Adobe Photoshop
- Difficulty: Beginner
- Completion Time: 30 minutes
You don't have to use photoshop which is an expensive program. If you're designing pinback buttons and have your own button maker then the following links are useful. Free graphic design programs are available!
|
Free Designing and Editing Software |
Free Design Tools and Content Free Fonts - DaFont.com Free Stock Photos - Stock.Xchng |
If you have found any useful resources or methods that have made your buttons better or have tips on graphic design, button design or button making then tell the Button Guy. He can then pass it on!!

Read more »
The Pro's and Cons of Multiple/ Interchangeable Die Machines March 12 2012
Multisize button makers sounds great. A button maker that makes different sized buttons because it has interchangeable dies - sweet idea!
But the reality is not so sweet...........
Problems with multi-size button makers are many. The advantages of multi-size button makers are few, in fact I can't think of any but if you have bought one and see an advantage let me know. I would love to hear about it.
1) Most multi-size button makers including the badge-a-minit use a plastic base for the dies. This is problematic, as the plastic wears quickly and the button makers no longer line up. This also applies to some of the made in China machines.
 |
 |
|
| Badge-A-Minit: 3-in-1 Badge-A-Matic Combo $1099 on sale! | $1699 on sale with cutters & parts. |
2) Price! The badge-a-minit machine is the same price as 3 standard button makers!!
3) Button parts - Badge-A-Minit takes non-standard button parts up to 300% more expensive than standard button parts.and also certain chinese machines use button sizes with European mm dies. Also non-standard.
4) And for me the biggest point is that button making is labour intensive. One machine with multi dies means only 1 person can work at a time and you have to keep messing with the dies.
Give me 3 different machines any day!
Read more »
Spring Pins or Pin-backs? March 05 2012 3 Comments
Question from Kelona 05/03/2012
Hi Button Guy! What is the difference between the pin-back button sets that come in 3 pieces (shell, mylar, pin back) vs. four pieces (shell, mylar, collet with separate pin? I notice some companies sell both. What is the purpose of the 4pc set? How is it used? and why do companies sell both?
Firstly here are some photos to see what we are discussing:
|
|
|
PIN-BACK BUTTON PARTS WITH PIN ALREADY INSERTED |
|
|
|
|
SPRING PIN BUTTON PARTS USING A SPRING PIN THAT IS INSERTED AFTER MAKING THE BUTTON. |


Standard pin-backs are only available for 1-1/4" buttons or larger. Spring Pins come standard with buttons smaller than 1-1/4" so that is the 1" and 7/8" button sizes. They have Spring Pin backs only. This is actually because the pin-back pins are too big for 1" or smaller buttons.
Spring pins are also made for the 1-1/4" and 2-1/4" sizes and I think it is simply because people like and want them. I see no real advantage for the end-user as pinbacks tend to stay on better and longer than spring pins. Also spring pin buttons take longer to make as adding the spring pin is an additional step. Spring pins are in some cases slightly cheaper because the manufacturer does not pay to pin the back..... the end-user does it for them.
So if you have a button maker that is 1-1/4" or larger you have the choice of pin-back or spring pin. If your button maker is 1" or smaller you have no choice.
If anyone out there sees an advantage to spring pins that I have missed do let me know!! But personally, when they are available I would go for pin-backs (with the built in pin).
-----Original Message-----
From: KELONA [mailto:shopifycontactform@outofthesandbox.com]
Sent: March-05-12 9:00 AM
To: The Button Guy - People Power Press
Subject: Message from KELONA
Name: KELONA
Message:
What is the difference between the pin-back button sets that come in 3 pieces (shell, mylar, pin back) vs. four pieces (shell, mylar, collet with separate pin? I notice some companies sell both. What is the purpose of the 4pc set? How is it used? and why do companies sell both?
------------------
Submitted from: http://peoplepowerpress.org/pages/about-us
Read more »
Need help with your custom button order - Artwork questions? November 24 2011 1 Comment
If you want to design artwork for custom buttons it can be a bit daunting the first time. For example it is common to think that if you want 2-1/4" buttons you make artwork that is 2-1/4". Sadly that is not the case. The cut size for a 2-1/4" button is 2.625" and the image size is 2.063". The image size being the viewable area on your final button and the cut size is the cut including the part of the image that folds around the back, otherwise known as the bleed size.
Sounds complicated? No worries, it actually isn't. Simple answer: Download a template here. There is a page of instructions as well as templates for many sizes.
I hope this helps but feel free to ask a question. To upload artwork use the UPLOAD PAGE.
 The Button Guy
Read more »
Starting your own business - Button making - low start up costs, great margin. November 23 2011


If you walked into the offices of one of those Wall Street bankers, you know the ones, fancy suit, insincere smile and the habit of licking his lips each time your hand goes anywhere near your wallet. Yep you know the guy, that crook that the Occupy movement is talking about...... Anyway you walk in and say I have a business where you invest 530, lets say million, in capital equipment including an 80 million investment in stock. Sales in the first quarter will be 2000 million or two billion and you then have the choice to sell off the equipment as an asset for a further say 300 million or you invest back 81 million of the handsome profit and this time reap the full benefit of the additional 2 billion sales without the capital expense. The Wall Street Banker would say it's not possible. There is no such easy investment - but there is - the scenario I have described is that of someone starting their own button making business.
Ok the millions and billions are exaggerated but do the math:
Button Maker, Circle Cutter and all the pieces for 1000 buttons. $530
Sale of Buttons: 1000 @ $2 = $2000
Resale value of a used button maker after 1000 buttons = Easily $300, probably more!
Better still: Cost of buying a further 1000 complete button parts = $81
Total revenue on 2000 buttons @ $2 each = $4000 Cost = $611 It's profitable, It's fun and unlike the bankers job, it's honest!
There are few pieces of equipment with such low start up cost that give this kind of return even if I have not included a few photocopies or your own home computer and printer that you may well already own.
So where do you sell your buttons...... ideas!


- Schools, Universities, Colleges. Take the button maker and make buttons on the spot!
- Setup a table at conferences. Make buttons related to the conference.
- Flea Market - Photo buttons or just make your own!
- Sports clubs, team buttons, football / hockey / soccer buttons.
- Fundraising and awareness for non-profits
- Advertising and promotional buttons - almost every local business is a potential client
- Festivals, Trade Shows and exhibitions.
- Music and band buttons - every school band is a potential client and so is U2!
- Weddings, birthdays, funeral memorials and parties.
- And speaking of parties and birthdays: Yes Kids birthday parties are huge and lucrative.
And what else can you do with buttons...... more ideas!


Remember you can do more than design buttons using graphics programs like Photoshop, Illustrator or Corel Draw. What about:
- Fabric Buttons
- Artists buttons - Draw your own.
- Collector buttons from comic strips and cartoons
- Modern Art buttons using contemporary magazines
- Collage buttons from newspapers and printed materials
- Photo buttons we already mentioned and they are very popular
- And last but not least paper, markers, crayons and a bunch of kids.
Whether you are thinking part-time or full-time button making is a great addition to a small business or a good platform to start a business. It's good for people who like people. It's fun, artistic, lucrative and low investment.
If you want to discuss opening your own button making business you need to talk to The Button Guy!

Read about button making workshops for school kids and daycare
Read more »
How to unjam your button maker - button making machine repair. November 18 2011 2 Comments
I get lots of people in the store with a jammed button maker. Andrew sent me some good pictures of his button maker. He thought his button maker was broken and needed repair. But it was only jammed.
 |
|
|
This is Andrew's button maker. It is a side to side action button maker, made in Wisconsin, USA. These are good heavy duty button machines that you can add air power and go industrial if you need it. |
This is the view from below up into the upper die of the jammed button maker. It is smooth, no screw hole so there is a shell stuck up in there or maybe two. |
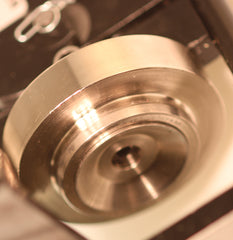 |
 |
|
This is the view up inside an upper die of a Tecre Button Maker that does not have a shell stuck inside. This is how it should look. You don't have to turn it upside down to look. Just get in the habit of putting your finger up inside to see if you can feel that screw hole. If it's smooth (see top right) it's jammed. |
This is what Andrew's button maker will look like looking up inside the upper die once the shell has been removed. There can be even 4 or 5 jammed up there. |

THE QUESTION:Hi there, I have a 3" button maker that needs a part. I can send pictures of the part needed. It basically does not wrap the paper around the backing...as a student pushed down so hard, he flattened the plate that has a ridge. Sort of hard to explain. Hope you can help.
Pictures sent are top left and right.
Hi Andrew
Looking at the photo it looks like you do not need a part or have a serious problem. There is merely a shell stuck in the upper die. Maybe 2 shells or even 3.
This happens when you do the first press and then maybe get distracted. The first shell is up inside the upper die and instead of then loading the pin-back you go back and load another shell and press the first press AGAIN. Now you've got 2 shells pressed up inside your upper die and the button maker is jammed.
If you walk away from the button maker or get the button maker out of the cupboard the first thing to do is put your finger up inside the UPPER DIE. You should be able to feel a screw hole. If it is smooth AS PER YOUR PICTURE then you've got a shell stuck up inside.
TO REMOVE A SHELL (Or as is often the case multiple shells). You need an awl or a bradawl.
An awl is a long pointed spike. It may be a:
* Bradawl, a tool for making holes in wood * Scratch awl, a tool used for marking wood. * Stitching awl, a tool for piercing holes in leather
Turn the button machine upside down and move the die mechanism in such a way to gain access to the upper die. Using the awl pick at the edge of the shell that is stuck inside the upper die and try to pick up an edge WITHOUT DAMAGING THE DIE. Once you have picked up an edge you can often pierce the tin with the awl and pull it out.
Now put your finger up inside again. Can you feel the screw hole or is it smooth. If it's smooth ... repeat. I have pulled 5 shells out of an abused button maker. Repeat until you can feel or see that screw hole.
Here's a photo for people with a Tecre Button Maker.

If you have the classic red n' black Tecre Button Machine the same thing applies if you need to fix a jam in your button maker.
The offending shell (or probably shells) will be up inside the upper die. Turn upside down. Swivel pickup die out of the way and try to catch the edge of the shell thats stuck using an awl. BE CAREFUL NOT TO DAMAGE YOUR DIES. Feel free to send your machine in to the Button Guy to fix. If you're a customer he may just fix it for free!

Got questions? Ask the Button Guy!
Read more »
What Size Button Maker do I need. What size buttons are good for what purpose. September 23 2011
When thinking about buying a button maker the first question is WHAT SIZE?
There are many sizes and various shapes for buttons. Round are the most cost effective but oval, rectangular, square and oblong are all useful for different effects.
 Size comparison. The smallest buttons available.
Checkout the button size list here This will give you an idea of all 21 sizes of buttons available and you can download templates for making your artwork.
But what size button should I make? Here are a few examples. These are not rules they are just a guide of what the majority of button makers are doing.
 |
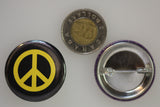 |
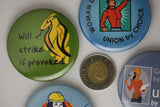 |
Left image shows 1-1/4", 2-1/4" and 3" buttons with toonie for size comparison. The centre image shows 1-1/2" pinback with toonie. The right image shows a 2-1/4" button.
Round buttons - Usually the most cost effective buttons!
7/8" - Cute japanese comic buttons.
1" - Band Buttons or Music related buttons are most commonly 1"
1-1/4" or sometimes 1-1/2" are often used for designer buttons or "One of a kind" show buttons.
1-1/2" - Very popular middle size
1-3/4" - Small election buttons
2-1/4" - Most common button of all. Good for Elections but also good for small photo buttons. Most common size for daycare centres, schools and events where kids are making their own designs with markers etc and you put it in a button for them.
3" / 3-1/2" - Most common for large election buttons. Mirror buttons. Most popular sizes for photo buttons where you take a photo and put it in a button - great for Hockey or Football team buttons.
6" Great for clock buttons.
Square, rectangular oblong and oval button shapes.
1" Square - Cute Designer buttons - square shape is quite unusual, makes them stand out!
1-3/4"x2-3/4" - Rectangular or Oblong - Great for business card buttons and magnets
1-3/4" x 2-3/4" oval - Very cool retro style
2" sq, 3" sq, 2"x3", 2-1/2"x3-1/2" rectangular - All very popular for fridge magnets and larger business buttons like "Ask me about......."
Still cannot decide your size?
One point is that a big button will be worn on the day at the "event". But a big button will be taken off as soon as people get out of the building. A smaller more subtle button can be worn for weeks after the "event". Good idea is to have BIG staff buttons and then smaller buttons for visitors.
If you're still in doubt you can always ask the button guy!
 He's the expert!
Read more »
Maintenance on a button maker September 20 2011 3 Comments
Maintaining your button machine.
Button makers, or at least the good ones require very little maintenance. Remember a good button maker is all metal, NO PLASTIC PARTS!! I have a number of the Tecre style button makers that are 10 years old, they have made trillions of buttons and work with very little maintenance. But these are smaller button sizes, 1" or 1-1/2" round. I also have larger button makers that need more attention and certainly need silicon lube. This is just a smear of lubrication every 500 buttons or so. It's cheap, quick and just becomes a habit. If you have a button maker you definitely need to get some silicon lube. This can also help and certainly does not hurt a smaller button maker.
Relevant question from a customer:
"I've used my button maker to make buttons since purchasing it from you, and I noticed upon pressing my latest set that the machine isn't wrapping the mylar tightly around the edges of the button at the very top of every couple of buttons I make. There is a little bubble of empty space between the edge of my button and the mylar itself. I've double checked that I'm not putting in double sheets of mylar or anything, and I'm using fairly thin paper (28lb) for the designs... What could be causing this? Thanks for your help!
To buy silicon lube online
HOW TO USE SILICON LUBRICATION ON YOUR BUTTON MACHINE.
1. Do not use oil, WD40 or anything but a clean silicon lubricant. Some people use silicon in an aerosol but for the button makers I find stick lubricant works better. This is to protect your images and your buttons. Grease or oil stained buttons will not do well!! Keep your button maker clean!
2. Identify the crimp die in your button maker. (See image below) Regardless of style or make of your machine you will have a crimp die where you put the pin-back in. (The pickup die is where you put the shell, image and then mylar) Most crimp dies have a 45 degree surface just visible above where the pin-back goes in. This is the spot! Just put a bit of the stick lube on your finger and rub it around the crimp die. Think of it more as massaging it in as to just smearing it across the surface. The purpose is to fill microscopic damage to the die making it smooth to allow the mylar to pass easily across the surface on the second press.
That usually does the trick and in normal circumstances will be enough. If you have very serious problems or you picked up a used button maker that's been in an attic for 25 years you could:
3. Slide or rotate the lower dies to allow easy access to the upper die. Using a silicon lubricant stick just put a little on your finger as if you were using lip balm, chapstick or lip gloss. Apply a modest smear to the perpendicular walls of the upper die. Massage the lubricant all the way around that upright wall of your upper die. Just enough to leave a thin film of silicon. No need to use much.
4. Go through the button making motion a couple of times to get the lube where you need it. Then make a button as normal. The first button or maybe two will need wiping with a clean cloth. After that your back in business.
5. Repeat every 500 buttons or as necessary. This maintenance requires very little lube. 1 lube stick will last a lifetime.
6. Another problem solver option for older or damaged button makers is to make sure the dies are clean, free from rust or paper, metal or plastic debris. You can use a cloth or if you've got it: compressed air to clear away the grunge. Then soak the dies with the more liquid style aerosol can silicon lubricant and then wipe clean with a clean dry cloth. Search the die for metal burrs and damage. Clean up any damage with very fine emery paper and then clean the die again with liquid silicon to remove any metal dust.
7. Sometimes an older red and black Tecre button maker grinds a bit when it swivels. DO NOT USE WD-40. Using lithium grease, available from any hardware store you can grease the base plate with a smear of silicon grease between the die carrier plate and the base plate. Just smear the base and swivel getting the grease between the two plates.
WHERE TO BUY SILICON LUBRICANT
Lube sticks are available at dollar stores and are inexpensive.
Read more »
Fundraising with buttons - Wanna get involved? August 27 2011
The number of wars, natural disasters, man-made disasters and catastrophies seem to be accelerating. Sometimes watching a strangers agony or the agony of a nation or a people becomes too much and we decide to help.
Right now, as I write, one could be fundraising for the famine in Somalia, the earthquake, Tsunami and nuclear disaster in Japan. Or Haiti, Chechnya, Iraq, Afghanistan. What about the Arab Spring? One could be fundraising for support in Syria, Egypt or Tunisia. Nearer to home there are first nations issues, health issues, water issues. Cancer , multiple schlerosis, disabilities, social justice...... and the list goes on.


How can buttons help!
I have stood at events and demonstrations rattling a tin, asking for cash and it works a little. People will put their spare change in a tin, after all if they are at the event they support the issue. But rattling the tin can be frustrating - I only ever did it once. The next time I made buttons, lots of them, with different slogans. I tried to make them funny, radical and in your face, then I had some mild one's. In other words I had buttons for a wide range of people. A few of us walked around with boards of buttons at a rally, yes rattling the tin but with buttons. Some people took 5 buttons and dropped in a buck, some people took a single button and dropped in $20. A few hours later we were counting up $750 that we sent to the International Red Cross. The receipt came back 2 weeks later and I stuck it on the wall. I got involved and it felt good. Gone was the hopeless frustration you feel watching the news everyday with no ability to help.
When you design buttons think of longevity
People will always wear your button at the event. But after your event, the next day, the next week you want your message out there. If you make great big buttons people will wear it on the day and remove it before they even get on the bus to go home. Consider that a smaller button is worn for a longer time. Make your message bold and clear! In campaigning for awareness around the genocide in Darfur the most successful button just said "DARFUR" big and bold. I wore this button every day on the subway, on the street, in the store and so many people asked me, " What's Darfur." - and I had my in and I could tell them about it. It worked.


Tips for good buttons.
A good button is a good design. Spend time and energy making it simple and striking. Use high resolution artwork don't just take stuff from the internet, it will be pixelated and impersonal.
Have a range of designs, appeal to different points of view, within the full spectrum of your campaign.
Think about size and shape. Don't just take your rectangular logo and stick it in a round button. It probably won't work well. Redesign your logo in a round design or make rectangular buttons. There are round, oval and rectangular buttons in 23 sizes.
A good button is recognisable across a room or a subway car. Instant recognition is valuable. If you see a pink ribbon you know what it represents, the bearer of the ribbon has remiinded you from across the room.
When a person wears your button they become your emissary, your advocate. Their friends, family, neighbours and community may or may not agree or care but the first step in changing minds is getting them to notice.
Where can I go from here?
You have identified your cause, checkout our premade campaign buttons and see if we have a fit. Grab a bag and get out there. That's a good way to try it. And once you have tried fundraising with buttons you will be back for your own button maker - it works.
You can also GET YOUR URL on one of our fundraising button packs. If you have chosen a button you would like to use you can place an order for the buttons and then add $15 or 15 minutes of artwork time and we will send you your buttons with your website on it.
Get designing!! Download a template here and we can make your custom buttons.
Template Page Custom Button Prices and Ordering
Read more »
- Previous
- Page 2 of 2